设计模式
设计模式定义
在软件工程领域,设计模式是一套通用的可复用的解决方案,用来解决在软件设计过程中产生的通用问题。它不是一个可以直接转换成源代码的设计,只是一套在软件系统设计过程中程序员应该遵循的最佳实践准则。
设计模式分类
创建型模式:共五种:工厂方法模式、抽象工厂模式、单例模式、建造者模式、原型模式
结构型模式:共七种:适配器模式、装饰器模式、代理模式、外观模式、桥接模式、组合模式、享元模式
行为型模式:共十一种:策略模式、模板方法模式、观察者模式、迭代子模式、责任链模式、命令模式、备忘录模式、状态模式、访问者模式、中介者模式、解释器模式
设计模式六大原则
- 总原则:开闭原则,对扩展开放,对修改关闭。
- 单一原则:每个类应该实现单一的职责,如若不然,就应该把类拆分。
- 里氏替换原则(LSP):子类对父类的方法尽量不要重写和重载。因为父类代表了定义好的结构,通过这个规范的接口与外界交互,子类不应该随便破坏它。
- 依赖倒转原则:这个是开闭原则的基础,具体来说就是面向接口编程,依赖于抽象而不依赖于具体。写代码时用到具体类时,不与具体类交互,而与具体类的上层接口交互。
- 接口隔离原则:每个接口中不存在子类用不到却必须实现的方法,如果不然,就要将接口拆分。使用多个隔离的接口要比使用单个接口要好。
- 迪米特法则(Demeter):一个类对自己依赖的类知道的越少越好。无论被依赖的类多么复杂,都应该将逻辑封装在方法内部,通过public方法提供给外部。这样当被依赖的类变化时,才能最小的影响该类。
- 合成复用原则:尽量使用对象组合,而不是通过继承来达到复用的目的。就是在一个新的对象里面使用一些已有的对象,使之成为新对象的一部分。新对象通过向这些对象的委派达到复用已有功能的目的。这样耦合度更低。不会破坏封装性,即黑盒复用,继承的话是白盒复用。父类会将实现细节暴露给子类。
设计模式
创建型模式
简单工厂模式Simple Factory
简单工厂模式不属于23种设计模式,简单工厂一般分为:普通简单工厂、多方法简单工厂、静态方法简单工厂。
- 普通简单工厂(举例:发送邮件和短信的例子):
创建二者的共同接口:创建实现类:public interface Sender { public void Send(); }创建工厂类:public class MailSender implements Sender { @Override public void Send() { System.out.println("this is mailsender!"); } } public class SmsSender implements Sender { @Override public void Send() { System.out.println("this is sms sender!"); } }测试:public class SendFactory { public Sender produce(String type) { if ("mail".equals(type)) { return new MailSender(); } else if ("sms".equals(type)) { return new SmsSender(); } else { System.out.println("请输入正确的类型!"); return null; } } }输出:this is sms sender!public class FactoryTest { public static void main(String[] args) { SendFactory factory = new SendFactory(); Sender sender = factory.produce("sms"); sender.Send(); } }- 多方法简单工厂:是对普通工厂方法模式的改进,在普通工厂方法模式中,如果传递的字符串出错,则不能正确创建对象,而多个工厂方法模式是提供多个工厂方法,分别创建对象。
对SendFactory进行修改:测试:public class SendFactory { public Sender produceMail(){ return new MailSender(); } public Sender produceSms(){ return new SmsSender(); } }输出:this is mailsender!public class FactoryTest { public static void main(String[] args) { SendFactory factory = new SendFactory(); Sender sender = factory.produceMail(); sender.Send(); } }- 静态方法简单工厂,将上面的多方法简单工厂里的方法置为静态的,可直接调用。
测试:public class SendFactory { public static Sender produceMail(){ return new MailSender(); } public static Sender produceSms(){ return new SmsSender(); } }输出:this is mailsender!public class FactoryTest { public static void main(String[] args) { Sender sender = SendFactory.produceMail(); sender.Send(); } }
总体来说,工厂模式适合:凡是出现了大量的产品需要创建,并且具有共同的接口时,可以通过工厂方法模式进行创建。
工厂方法模式Factory Method
简单工厂模式类的创建依赖工厂类,也就是说,如果想要拓展程序,必须对工厂类进行修改,这违背了闭包原则。需要使用工厂方法模式,创建一个工厂接口和创建多个工厂实现类,这样一旦需要增加新的功能,直接增加新的工厂类就可以了,不需要修改之前的代码。
举例(共同接口):public interface Sender { public void Send(); }实现类:
public class MailSender implements Sender { @Override public void Send() { System.out.println("this is mailsender!"); } } public class SmsSender implements Sender { @Override public void Send() { System.out.println("this is sms sender!"); } }工厂类:
public class SendMailFactory implements Provider {

   @Override
   public Sender produce(){
       return new MailSender();
   }
}

public class SendSmsFactory implements Provider{

   @Override
   public Sender produce() {
       return new SmsSender();
   }
}
提供接口:
public interface Provider {
   public Sender produce();
}
测试类:
public class Test {

   public static void main(String[] args) {
       Provider provider = new SendMailFactory();
       Sender sender = provider.produce();
       sender.Send();
   }
}
这样工厂方法模式如果想要添加一个功能,只需要做一个实现类(实现Sender),同时做一个工厂类,实现Provider接口,就OK。无需更改现成代码。扩展性较好。
抽象工厂模式Abstract Factory
抽象工厂模式和工厂方法模式很相似,区别如下:
- 工厂方法模式:
- 一个抽象产品类,可以派生出多个具体产品类。
- 一个抽象工厂类,可以派生出多个具体工厂类。
- 每个具体工厂类只能创建一个具体产品类的实例。
- 抽象工厂模式:
- 多个抽象产品类,每个抽象产品类可以派生出多个具体产品类。
- 一个抽象工厂类,可以派生出多个具体工厂类。
- 每个具体工厂类可以创建多个具体产品类的实例,也就是创建的是一个产品线下的多个产品。
- 工厂方法模式只有一个抽象产品类,而抽象工厂模式有多个。
- 工厂方法模式的具体工厂类只能创建一个具体产品类的实例,而抽象工厂模式可以创建多个。
- 工厂方法创建 “一种” 产品,他的着重点在于”怎么创建”。抽象工厂需要创建一系列产品,着重点在于”创建哪些”产品上。
抽象:实现1:interface IConnection { void connect(); } interface ICommand { void command(); } interface IDatabaseUtils { IConnection getConnection(); ICommand getCommand(); }实现2:class MysqlConnection implements IConnection { @Override public void connect() { System.out.println("mysql连接java"); } } class MysqlCommand implements ICommand { @Override public void command() { System.out.println("执行mysql命令"); } } class MysqlUtils implements IDatabaseUtils { @Override public IConnection getConnection() { return new MysqlConnection(); } @Override public ICommand getCommand() { return new MysqlCommand(); } }测试类:class OracleConnection implements IConnection { @Override public void connect() { System.out.println("oracle连接java"); } } class OracleCommand implements ICommand { @Override public void command() { System.out.println("执行oracle命令"); } } class OracleUtils implements IDatabaseUtils { @Override public IConnection getConnection() { return new OracleConnection(); } @Override public ICommand getCommand() { return new OracleCommand(); } }public class AbstractFactoryTest { public static void main(String[] args) { // IDatabaseUtils databaseUtils = new MysqlUtils(); IDatabaseUtils databaseUtils = new OracleUtils(); IConnection connection = databaseUtils.getConnection(); ICommand command = databaseUtils.getCommand(); command.command(); } }
单例模式 Singleton
单例对象是一种常用的设计模式。在Java应用中,单例对象能保证在一个JVM中,该对象只有一个实例存在。这样的模式有几个好处:
- 创建大对象,增加系统开销。
- 对象少创建一些,减轻GC压力。
- 一些控制类,控制流程,必须要求单例。
1.懒汉:
class LazySingleton {
   private static volatile LazySingleton instance;

   private LazySingleton() throws Exception {
       if (instance != null) {
           throw new Exception("创建单例失败");
       }
   };

   public static LazySingleton getInstance() throws Exception {
       // 双重检测锁模式的懒汉式单例,简称为DCL懒汉式
       if (instance == null) {
           synchronized(LazySingleton.class) {
               if (instance == null) {
                   instance = new LazySingleton();
                   // 需要加防止指令重排
                   // 1. 分配空间
                   // 2. 初始化
                   // 3. 引用赋值
               }
           }
       }
       return instance;
   }
}
测试
public class LazySingletonTest {
   public static void main(String[] args) {
       new Thread(() -> {
           try {
               System.out.println(LazySingleton.getInstance());
           } catch (Exception e) {
               e.printStackTrace();
           }
       }).start();
       new Thread(() -> {
           try {
               System.out.println(LazySingleton.getInstance());
           } catch (Exception e) {
               e.printStackTrace();
           }
       }).start();
   }
}
反射测试
class LazyReflex {
   public static void main(String[] args) throws Exception {
       // 反射调用
       Constructor<LazySingleton> declaredConstructor = LazySingleton.class.getDeclaredConstructor();
       declaredConstructor.setAccessible(true);
       // 先反射,后获取,不能避免反射情况下多例
       LazySingleton reflexInstance = declaredConstructor.newInstance();
       LazySingleton single = LazySingleton.getInstance();
       System.out.println(reflexInstance == single);
   }
}
2.饿汉:
class HungrySingleton {
   public static HungrySingleton instance;

   static {
       try {
           instance = new HungrySingleton();
       } catch (Exception e) {
           e.printStackTrace();
       }
   }

   private HungrySingleton() throws Exception {
       if (instance != null) {
           throw new Exception("单例创建失败");
       }
   };

   public static HungrySingleton getInstance() {
       return instance;
   }

}
测试
public class HungrySingletonTest {
   public static void main(String[] args) {
       new Thread(() -> {
           System.out.println(HungrySingleton.getInstance());
       }).start();
       new Thread(() -> {
           System.out.println(HungrySingleton.getInstance());
       }).start();
   }
}
反射测试
class HungryReflex {
   public static void main(String[] args) throws NoSuchMethodException, IllegalAccessException, InvocationTargetException, InstantiationException {
       // 反射调用
       HungrySingleton single = HungrySingleton.getInstance();
       Constructor<HungrySingleton> declaredConstructor = HungrySingleton.class.getDeclaredConstructor();
       declaredConstructor.setAccessible(true);
       HungrySingleton reflexInstance = declaredConstructor.newInstance();
       System.out.println(reflexInstance == single);
   }
}
3.内部类:
// 这里实现Serializable,编写readResolve方法是解决序列化单例问题
class InnerSingleton implements Serializable {
   // 兼容版本号,以后也不要改
   private static final long serialVersionUID = 6170219213067151029L;

   private static class InnerSingletonHolder {
       public static InnerSingleton instance;

       static {
           try {
               instance = new InnerSingleton();
           } catch (Exception e) {
               e.printStackTrace();
           }
       }
   }

   private InnerSingleton() throws Exception {
       if (InnerSingletonHolder.instance != null) {
           throw new Exception("单例创建失败");
       }
   }

   public static InnerSingleton getInstance() {
       return InnerSingletonHolder.instance;
   }

   Object readResolve() throws ObjectStreamException {
       // 如果是流生成的对象,会返回这个对象
       return InnerSingletonHolder.instance;
   }
}
测试
public class InnerSingletonTest {
   public static void main(String[] args) {
       // 多线程获取单例
       CountDownLatch countDownLatch = new CountDownLatch(1);
       new Thread(() -> {
           try {
               countDownLatch.await();
           } catch (InterruptedException e) {
               e.printStackTrace();
           }
           System.out.println(InnerSingleton.getInstance());
       }).start();
       new Thread(() -> {
           try {
               countDownLatch.await();
           } catch (InterruptedException e) {
               e.printStackTrace();
           }
           System.out.println(InnerSingleton.getInstance());
       }).start();
       countDownLatch.countDown();
   }
}
反射测试
class Reflex {
   public static void main(String[] args) throws NoSuchMethodException, IllegalAccessException, InvocationTargetException, InstantiationException {
       // 反射调用
       InnerSingleton single = InnerSingleton.getInstance();
       Constructor<InnerSingleton> declaredConstructor = InnerSingleton.class.getDeclaredConstructor();
       declaredConstructor.setAccessible(true);
       InnerSingleton reflexInstance = declaredConstructor.newInstance();
       System.out.println(reflexInstance == single);
   }
}
序列化测试
class SerializableTest {
   public static void main(String[] args) throws NoSuchMethodException, IllegalAccessException, InvocationTargetException, InstantiationException, IOException, ClassNotFoundException {
       // 序列化(重写Serializable中的readResolve方法,返回需要的数据)
       InnerSingleton instance = InnerSingleton.getInstance();
       ObjectOutputStream oos = new ObjectOutputStream(new FileOutputStream("singleSerializable"));
       oos.writeObject(instance);
       oos.close();
       ObjectInputStream ois = new ObjectInputStream(new FileInputStream("singleSerializable"));
       InnerSingleton object = ((InnerSingleton) ois.readObject());
       System.out.println(object == instance);
   }
}
4.枚举:
enum天生解决单例问题,反射,多线程,序列化,这种方式是 Effective Java 作者 Josh Bloch 提倡的方式,它不仅能避免多线程同步问题,而且还自动支持序列化机制,防止反序列化重新创建新的对象,绝对防止多次实例化。public enum EnumSingleton { INSTANCE; }测试
class EnumTest {
   public static void main(String[] args) {
       EnumSingleton instance1 = EnumSingleton.INSTANCE;
       EnumSingleton instance2 = EnumSingleton.INSTANCE;
       System.out.println(instance1 == instance2);
   }
}
反射测试
public static void main(String[] args) throws NoSuchMethodException, IllegalAccessException, InvocationTargetException, InstantiationException {
       Constructor<EnumSingleton> declaredConstructor = EnumSingleton.class.getDeclaredConstructor(String.class, int.class);
       declaredConstructor.setAccessible(true);
       declaredConstructor.newInstance("INSTANCE", 0);
   }
构建者模式 Builder
定义:将一个复杂对象的构建与其表示分离,使得同样的构建过程可以创建不同的表示。构建者模式隐藏了复杂对象的创建过程,它把复杂对象的创建过程加以抽象,通过子类继承或者重载的方式,动态的创建具有复合属性的对象。
适用场景:当一个类的构造函数参数个数超过4个,而且这些参数有些是可选的参数,考虑使用构造者模式。public class Computer { private String cpu;//必须 private String ram;//必须 private int usbCount;//可选 private String keyboard;//可选 private String display;//可选 }builder模式实现:
@Data
public class Computer {
   private final String cpu;//必须
   private final String ram;//必须
   private final int usbCount;//可选
   private final String keyboard;//可选
   private final String display;//可选

   private Computer(Builder builder){
       this.cpu=builder.cpu;
       this.ram=builder.ram;
       this.usbCount=builder.usbCount;
       this.keyboard=builder.keyboard;
       this.display=builder.display;
   }
   public static class Builder{
       private String cpu;//必须
       private String ram;//必须
       private int usbCount;//可选
       private String keyboard;//可选
       private String display;//可选

       public Builder(String cup,String ram){
           this.cpu=cup;
           this.ram=ram;
       }

       public Builder setUsbCount(int usbCount) {
           this.usbCount = usbCount;
           return this;
       }
       public Builder setKeyboard(String keyboard) {
           this.keyboard = keyboard;
           return this;
       }
       public Builder setDisplay(String display) {
           this.display = display;
           return this;
       }
       public Computer build(){
           return new Computer(this);
       }
   }
}
使用:链式调用,一步一步的把对象构建出来:
public class BuilderTest {
   public static void main(String[] args) {
       Computer computer=new Computer.Builder("因特尔","三星")
               .setDisplay("三星24寸")
               .setKeyboard("罗技")
               .setUsbCount(2)
               .build();
       System.out.println(computer.toString());
   }
}
原型模式 Prototype
将一个对象作为原型,对其进行复制、克隆,产生一个和原对象类似的新对象。
Object类的clone方法是一个本地方法,它直接操作内存中的二进制流进行对象拷贝,需要大量创建对象时,原型模式可以提高性能
克隆时构造方法不会执行,连访问权限对原型模式无效。所以单例与原型是冲突的
Object类的clone方法是浅拷贝,深拷贝需要手动实现(深拷贝:8种基本类型以及他们的封装类型 + String,其余的都是浅拷贝)@Data @AllArgsConstructor class Product implements Cloneable{ int id; String name; Color data; @Override public Product clone() throws CloneNotSupportedException { // 引用对象需要手动处理,不然浅拷贝 Product product = (Product) super.clone(); // 处理color属性,使其深拷贝 Color color = this.data.clone(); product.setData(color); return product; } } @Data @AllArgsConstructor class Color implements Cloneable{ String value; @Override public Color clone() throws CloneNotSupportedException { return (Color) super.clone(); } }测试
public class PrototypeTest {
   public static void main(String[] args) throws CloneNotSupportedException {
       Product product = new Product(1, "test", new Color("red"));
       Product clone = product.clone();
       product.setId(5);
       product.getData().setValue("green");
       System.out.println(product);
       System.out.println(clone);
   }
}
结构型模式
适配器模式Adapter
适配器模式将某个类的接口转换成客户端期望的另一个接口表示,目的是消除由于接口不匹配所造成的类的兼容性问题。主要分为三类:类的适配器模式、对象的适配器模式、接口的适配器模式。
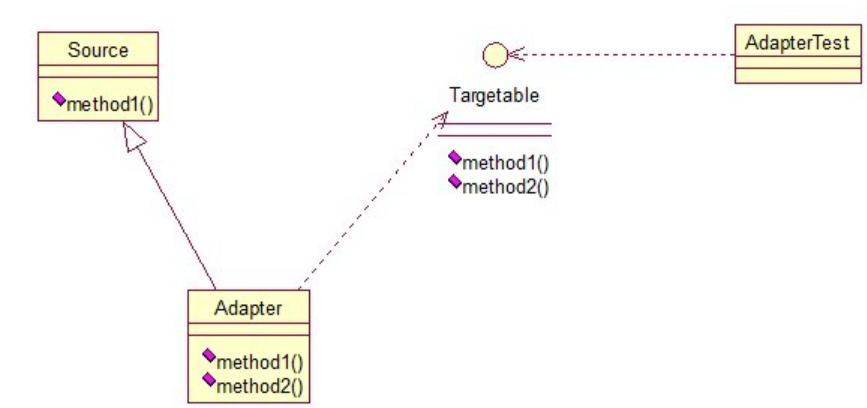
- 类的适配器模式,将接口转换为指定的接口,使其兼容(类适配器,继承的方式,违背Delemiter)
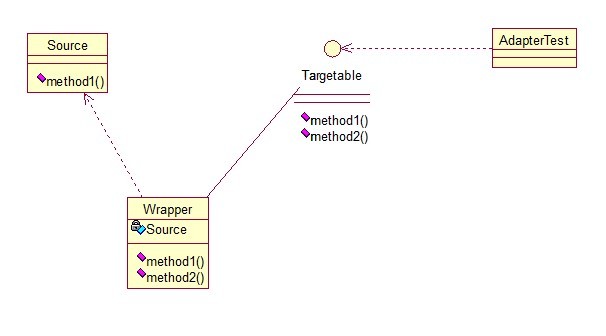
public class Source {
   public void method1() {
       System.out.println("this is original method!");
   }
}

public interface Targetable {
   /* 与原类中的方法相同 */
   public void method1();
   /* 新类的方法 */
   public void method2();
}

public class Adapter extends Source implements Targetable {
   @Override
   public void method2() {
       System.out.println("this is the targetable method!");
   }
}
public class AdapterTest { public static void main(String[] args) { Targetable target = new Adapter(); target.method1(); target.method2(); } }- 对象的适配器模式,将接口转换为指定的接口,使其兼容(对象适配器,组合的方式)
持有Source类的实例,解决兼容测试:public class Wrapper implements Targetable { private Source source; public Wrapper(Source source){ super(); this.source = source; } @Override public void method2() { System.out.println("this is the targetable method!"); } @Override public void method1() { source.method1(); } }public class AdapterTest { public static void main(String[] args) { Source source = new Source(); Targetable target = new Wrapper(source); target.method1(); target.method2(); } }- 接口的适配器模式
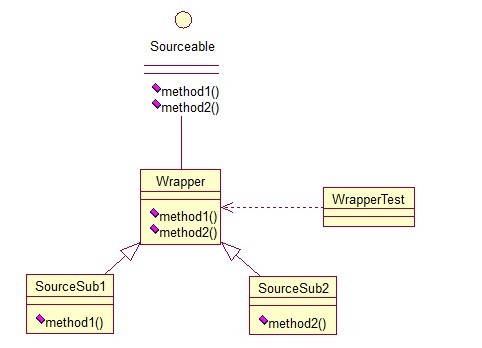
有时接口中有多个抽象方法,实现时必须实现所有方法,但并不是所有的方法都是我们需要的,引入了接口的适配器模式,借助于一个抽象类,该抽象类实现了该接口,实现了所有的方法,然后写一个类继承该抽象类,重写需要的方法:测试:/* 接口 */ public interface Sourceable { public void method1(); public void method2(); } /* 借助抽象类 */ public abstract class Wrapper2 implements Sourceable{ public void method1(){} public void method2(){} } /* 与抽象类打交道 */ public class SourceSub1 extends Wrapper2 { public void method1(){ System.out.println("the sourceable interface's first Sub1!"); } } /* 与抽象类打交道 */ public class SourceSub2 extends Wrapper2 { public void method2(){ System.out.println("the sourceable interface's second Sub2!"); } }public class WrapperTest { public static void main(String[] args) { Sourceable source1 = new SourceSub1(); Sourceable source2 = new SourceSub2(); source1.method1(); source1.method2(); source2.method1(); source2.method2(); } }
- 类的适配器模式:当希望将一个类转换成满足另一个新接口的类时,可以使用类的适配器模式
- 对象的适配器模式:当希望将一个对象转换成满足另一个新接口的对象时,可以创建一个Wrapper类,持有原类的一个实例,在Wrapper类的方法中,调用实例的方法就行。
- 接口的适配器模式:当不希望实现一个接口中所有的方法时,可以创建一个抽象类Wrapper,实现所有方法,我们写别的类的时候,继承抽象类即可。
装饰模式 Decorator
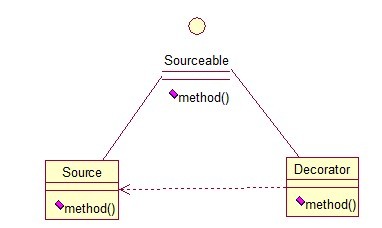
装饰模式就是给一个对象动态增加一些新的功能,要求装饰对象和被装饰对象实现同一个接口,装饰对象持有被装饰对象的实例。缺点:产生过多相似的对象,不易排错!
Source类是被装饰类,Decorator类是一个装饰类,可以为Source类动态的添加一些功能:public interface Sourceable { public void method(); } public class Source implements Sourceable { @Override public void method() { System.out.println("原始方法!"); } } public class Decorator implements Sourceable { private Sourceable source; public Decorator(Sourceable source){ this.source = source; } @Override public void method() { System.out.println("新增功能!"); source.method(); System.out.println("after decorator!"); } }测试:
public class DecoratorTest {
   public static void main(String[] args) {
       Sourceable source = new Source();
       Sourceable obj = new Decorator(source);
       obj.method();
   }
}
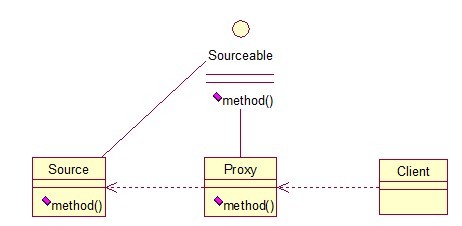
代理模式 Proxy
代理模式就是多一个代理类出来,替原对象进行一些操作,比如中介。
public interface Sourceable {
   public void method();
}

public class Source implements Sourceable {
   @Override
   public void method() {
       System.out.println("the original method!");
   }
}

public class Proxy implements Sourceable {

   private Source source;
   public Proxy(){
       super();
       this.source = new Source();
   }
   @Override
   public void method() {
       before();
       source.method();
       atfer();
   }
   private void atfer() {
       System.out.println("after proxy!");
   }
   private void before() {
       System.out.println("before proxy!");
   }
}

public class ProxyTest {
   public static void main(String[] args) {
       Sourceable source = new Proxy();
       source.method();
   }
}
代理模式的应用场景:
如果已有的方法在使用的时候需要对原有的方法进行改进,此时有两种办法:
- 修改原有的方法来适应。这样违反了“对扩展开放,对修改关闭”的原则。
- 就是采用一个代理类调用原有的方法,且对产生的结果进行控制。这种方法就是代理模式。
使用代理模式,可以将功能划分的更加清晰,有助于后期维护!
装饰器模式和代理模式区别:
装饰器模式关注于在一个对象上动态的添加方法,而代理模式关注于控制对对象的访问。用代理模式,代理类可以对它的客户隐藏一个对象的具体信息。因此,当使用代理模式的时候,我们常常在一个代理类中创建一个对象的实例。当我们使用装饰器模式的时候,我们通常的做法是将原始对象作为一个参数传给装饰者的构造器。
使用代理模式,代理和真实对象之间的的关系通常在编译时就已经确定了,而装饰者能够在运行时递归地被构造。/* 代理模式 */ Sourceable source = new Proxy(); /* (构造函数)关系在编译时确定 */ this.source = new Source(); /* 装饰器模式 */ Sourceable source = new Source(); Sourceable obj = new Decorator(source);
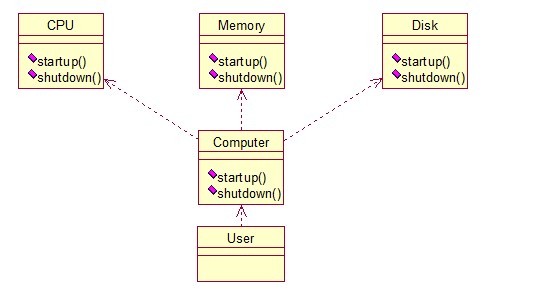
外观模式 Facade
外观模式是为了解决类与类之间的依赖关系,将类与类的关系放在一个Facade类中,内部逻辑内部实现,一些复杂的操作封装成一个接口供外部调用
以一个计算机的启动过程为例:public class CPU { public void startup(){ System.out.println("cpu startup!"); } public void shutdown(){ System.out.println("cpu shutdown!"); } } public class Memory { public void startup(){ System.out.println("memory startup!"); } public void shutdown(){ System.out.println("memory shutdown!"); } } public class Disk { public void startup(){ System.out.println("disk startup!"); } public void shutdown(){ System.out.println("disk shutdown!"); } } // 封装好的类,对外暴露startup,shutdown public class Computer { private CPU cpu; private Memory memory; private Disk disk; public Computer(){ cpu = new CPU(); memory = new Memory(); disk = new Disk(); } public void startup(){ System.out.println("start the computer!"); cpu.startup(); memory.startup(); disk.startup(); System.out.println("start computer finished!"); } public void shutdown(){ System.out.println("begin to close the computer!"); cpu.shutdown(); memory.shutdown(); disk.shutdown(); System.out.println("computer closed!"); } }测试:
public static void main(String[] args) {
       Computer computer = new Computer();
       computer.startup();
       computer.shutdown();
   }
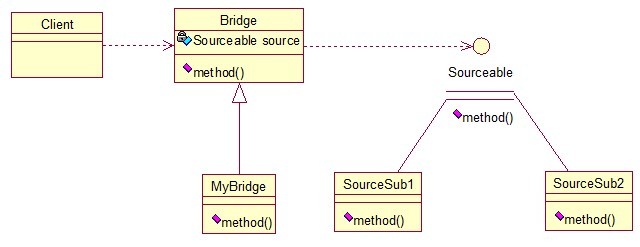
桥接模式 Bridge
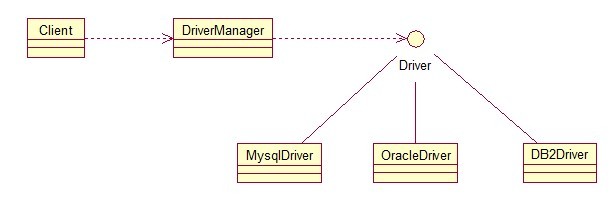
桥接模式是将抽象部分与它的实现部分分离,使它们都可以独立地变化。像JDBC桥DriverManager一样,JDBC进行连接数据库的时候,在各个数据库之间进行切换,不需要动太多的代码,原因就是JDBC提供统一接口,每个数据库提供各自的实现,用一个叫做数据库驱动的程序来桥接
/* 定义接口 */
public interface Sourceable {
   public void method();
}
/* 两个实现类 */
public class SourceSub1 implements Sourceable {

   @Override
   public void method() {
       System.out.println("this is the first sub!");
   }
}
public class SourceSub2 implements Sourceable {

   @Override
   public void method() {
       System.out.println("this is the second sub!");
   }
}
/* 定义桥 */
public abstract class Bridge {
   private Sourceable source;

   public void method(){
       source.method();
   }

   public Sourceable getSource() {
       return source;
   }

   public void setSource(Sourceable source) {
       this.source = source;
   }
}

public class MyBridge extends Bridge {
   public void method(){
       getSource().method();
   }
}
测试:
public static void main(String[] args) {
       Bridge bridge = new MyBridge();
       /*调用第一个对象*/
       Sourceable source1 = new SourceSub1();
       bridge.setSource(source1);
       bridge.method();
       /*调用第二个对象*/
       Sourceable source2 = new SourceSub2();
       bridge.setSource(source2);
       bridge.method();
}
JDBC原理:
优点:
- 抽象和实现的分离。
- 优秀的扩展能力。
- 实现细节对客户透明。
缺点:桥接模式的引入会增加系统的理解与设计难度,由于聚合关联关系建立在抽象层,要求开发者针对抽象进行设计与编程。
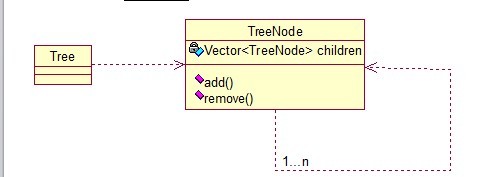
组合模式 Composite
组合模式有时又叫部分-整体模式在处理类似树形结构的问题时比较方便,关系图:
// 菜单组件:抽象根节点
public abstract class MenuComponent {
   protected String name;
   protected int level;
   public void add(MenuComponent menuComponent) {
       throw new UnsupportedOperationException();
   }
   public void remove(MenuComponent menuComponent) {
       throw new UnsupportedOperationException();
   }
   public MenuComponent getChild(int index) {
       throw new UnsupportedOperationException();
   }
   public String getName() {
       return name;
   }
   public abstract void print();
}

//菜单:树枝节点
public class Menu extends MenuComponent{

   private List<MenuComponent> children = new ArrayList<>();

   Menu(String name, int level) {
       this.name = name;
       this.level = level;
   }
   @Override
   public void add(MenuComponent menuComponent) {
       children.add(menuComponent);
   }
   @Override
   public void remove(MenuComponent menuComponent) {
       children.remove(menuComponent);
   }
   @Override
   public MenuComponent getChild(int index) {
       return children.get(index);
   }
   @Override
   public void print() {
       for (int i = 0; i < level; i++) {
           System.out.print("-");
       }
       System.out.println(name);
       for (MenuComponent item : children) {
           item.print();
       }
   }
}

// 菜单项:叶子节点
public class MenuItem extends MenuComponent{

   public MenuItem(String name, int level) {
       this.name = name;
       this.level = level;
   }
   @Override
   public void print() {
       System.out.println(name);
   }
}
测试:
public class CompositeTest {
   public static void main(String[] args) {
       // 组装树;
       MenuComponent menuRoot = new Menu("系统管理", 1);

       MenuComponent menu1 = new Menu("菜单管理", 2);
       MenuComponent menu2 = new Menu("权限管理", 2);
       MenuComponent menu3 = new Menu("字典管理", 2);

       MenuComponent menuItem1 = new Menu("菜单管理1", 3);
       MenuComponent menuItem2 = new Menu("菜单管理2", 3);
       MenuComponent menuItem3 = new Menu("权限管理1", 3);
       MenuComponent menuItem4 = new Menu("权限管理2", 3);
       MenuComponent menuItem5 = new Menu("字典管理1", 3);
       MenuComponent menuItem6 = new Menu("字典管理2", 3);

       menuRoot.add(menu1);
       menuRoot.add(menu2);
       menuRoot.add(menu3);
       menu1.add(menuItem1);
       menu1.add(menuItem2);
       menu2.add(menuItem3);
       menu2.add(menuItem4);
       menu3.add(menuItem5);
       menu3.add(menuItem6);
       // 打印树;
       menuRoot.print();
   }
}
使用场景:将多个对象组合在一起进行操作,常用于表示树形结构中,例如二叉树,数等。
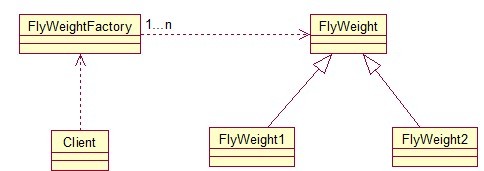
享元模式 Flyweight
享元模式是实现对象的共享,即共享池,减少内存开销,通常与工厂模式一起使用。
FlyWeightFactory创建管理对象,获取对象时,工厂需要检查当前对象池中是否有符合条件的对象,有就返回,没有就创建
JDBC连接池:url、driverClassName、username、password及dbname,这些属性对于每个连接来说都一样,建一个工厂类,将上述类似属性作为内部数据,其它的作为外部数据,在方法调用时,当做参数传进来,减少了实例的数量。
字符串常量池也是享元模式public class ConnectionPool { private Vector<Connection> pool; /*公有属性*/ private String url = "jdbc:mysql://localhost:3306/test"; private String username = "root"; private String password = "root"; private String driverClassName = "com.mysql.jdbc.Driver"; private int poolSize = 100; private static ConnectionPool instance = null; Connection conn = null; /*构造方法,做一些初始化工作*/ private ConnectionPool() { pool = new Vector<Connection>(poolSize); for (int i = 0; i < poolSize; i++) { try { Class.forName(driverClassName); conn = DriverManager.getConnection(url, username, password); pool.add(conn); } catch (ClassNotFoundException e) { e.printStackTrace(); } catch (SQLException e) { e.printStackTrace(); } } } /* 返回连接到连接池 */ public synchronized void release() { pool.add(conn); } /* 返回连接池中的一个数据库连接 */ public synchronized Connection getConnection() { if (pool.size() > 0) { Connection conn = pool.get(0); pool.remove(conn); return conn; } else { return null; } } }通过连接池的管理,实现了数据库连接的共享,不需要每一次都重新创建连接,节省了数据库重新创建的开销,提升了系统的性能!
行为型模式
策略模式 Strategy
定义一系列算法,每个算法封装起来,可以相互替换,把算法责任和实现分离,委派给管理对象进行管理,主要关注算法策略的切换
// 策略的抽象
public interface Strategy {
   void logic();
}

// 策略的实现1
public class StrategyA implements Strategy{
   @Override
   public void logic() {
       System.out.println("策略A");
   }
}

// 策略的实现2
public class StrategyB implements Strategy{
   @Override
   public void logic() {
       System.out.println("策略B");
   }
}

// 管理,聚合
@Data
@AllArgsConstructor
public class StrategyContext {
   private Strategy strategy;
   public void logic() {
       strategy.logic();
   }
}
测试:
public class StrategyTest {
   public static void main(String[] args) {
       // 春天执行逻辑A
       StrategyContext strategyContext = new StrategyContext(new StrategyA());
       strategyContext.logic();
       // 夏天执行逻辑B
       strategyContext.setStrategy(new StrategyB());
       strategyContext.logic();
   }
}
责任链模式 Chain of Responsibility
将一系列逻辑依次执行,上一个执行完执行下一个,直到执行完毕或者执行失败
根据请求,验证访问频率和登录权限:// 请求,访问频率和是否登录放在这里面 @Data @AllArgsConstructor class Request { private boolean login; private boolean frequentOK; private boolean isPermit; private boolean sensitiveWord; private String body; static class RequestBuilder { private boolean login; private boolean frequentOK; private boolean isPermit; private boolean sensitiveWord; private String body; RequestBuilder login(boolean login) { this.login = login; return this; } RequestBuilder frequentOK(boolean frequentOK) { this.frequentOK = frequentOK; return this; } RequestBuilder isPermit(boolean isPermit) { this.isPermit = isPermit; return this; } RequestBuilder sensitiveWord(boolean sensitiveWord) { this.sensitiveWord = sensitiveWord; return this; } RequestBuilder body(String body) { this.body = body; return this; } public Request build() { Request request = new Request(login, frequentOK, isPermit, sensitiveWord, body); return request; } } } // 抽象处理者角色 @Data abstract class Handler { Handler next; public Handler(Handler handler) { next = handler; } // 流程验证 abstract boolean process(Request request); } // 具体处理者角色1(验证访问频率) class FrequentHandler extends Handler { public FrequentHandler(Handler handler) { super(handler); } @Override boolean process(Request request) { System.out.println("验证访问频率"); if (request.isFrequentOK()) { Handler next = this.getNext(); if (null == next) { // 这个节点已经是最后节点,执行完成 return true; } // next的process判断,一直next判断,直到null = next if (!next.process(request)) { // 下一个节点处理失败 return false; } else { return true; } } return false; } } // 具体处理者角色2(验证登录) class LoginHandler extends Handler { public LoginHandler(Handler handler) { super(handler); } @Override boolean process(Request request) { System.out.println("登录验证"); if (request.isLogin()) { Handler next = this.getNext(); if (null == next) { return true; } if (!next.process(request)) { return false; } else { return true; } } return false; } }测试:
public class ChainTest {
   public static void main(String[] args) {
       Request request = new Request.RequestBuilder().frequentOK(true).login(true).build();
       Handler frequentHandler = new FrequentHandler(new LoginHandler(null));
       if (frequentHandler.process(request)) {
           System.out.println("====正常进入业务逻辑====");
       } else {
           System.out.println("======验证失败=====");
       }
   }
}
模板方法模式 TemplateMethod
定义一个方法骨架,让一些步骤被子类实现,实现特定的逻辑自由切换
// 模板
abstract class TemplateMould {
   public void logic() {
       System.out.println("统一处理");
       special();
   };
   abstract protected void special();
}

// 实现1
class RealOne extends TemplateMould {
   @Override
   protected void special() {
       System.out.println("one特定逻辑");
   }
}

// 实现2
class RealTwo extends TemplateMould {
   @Override
   protected void special() {
       System.out.println("two特定逻辑");
   }
}
测试:
public class TemplateMethodTest {
   public static void main(String[] args) {
       TemplateMould template1 = new RealOne();
       template1.logic();
       TemplateMould template2= new RealTwo();
       template2.logic();
   }
}
观察者模式 Observer
定义对象之间一对多依赖,让多个观察者监听一个主题对象,主题对象发生变化时,通知所有观察者
// 容器
class Subject {
   private List<Observer> observers = new ArrayList<>();
   public void add(Observer observer) {
       observers.add(observer);
   }
   public void remove(Observer observer) {
       observers.remove(observer);
   }
   public void notifyObserver() {
       for (Observer item : observers) {
           item.update("test");
       }
   }
}

// 观察者抽象
interface Observer {
   public void update(Object object);
}

// 观察者实现
class ObserverOne implements Observer {
   @Override
   public void update(Object object) {
       System.out.println("1收到:" + object);
   }
}

// 观察者实现
class ObserverTwo implements Observer {
   @Override
   public void update(Object object) {
       System.out.println("2收到:" + object);
   }
}
测试:
public class ObserverTest {
   public static void main(String[] args) {
       Observer observer1 = new ObserverOne();
       Observer observer2 = new ObserverTwo();
       Subject subject = new Subject();
       subject.add(observer1);
       subject.add(observer2);
       subject.notifyObserver();
       System.out.println("移除1");
       subject.remove(observer1);
       subject.notifyObserver();
   }
}
中介者模式 Mediator
引入一个中介者来协调系统中的对象交互,减少对象之间的依赖关系,对象只于中介者交互
// 抽象中介者
abstract class Mediator {
   public abstract void register(Colleague colleague);
   // 转发
   public abstract void relay(Colleague colleague, Object o);
}

// 具体中介者
class RealMediator extends Mediator {

   private List<Colleague> list = new ArrayList<>();

   @Override
   public void register(Colleague colleague) {
       if (!list.contains(colleague)) {
           list.add(colleague);
           colleague.setMediator(this);
       }
   }
   // 转发
   @Override
   public void relay(Colleague colleague, Object o) {
       // 让所有其它同事接收消息
       for (Colleague item : list) {
           if (colleague != item) {
               item.receive(o);
           }
       }
   }
}

// 抽象同事类
@Data
abstract class Colleague {
   protected Mediator mediator;
   public abstract void receive(Object o);
   public abstract void send(Object o);
}

// 具体同事类1
class RealColleague1 extends Colleague {

   @Override
   public void receive(Object o) {
       System.out.println("具体同事1收到消息:" + o);
   }
   @Override
   public void send(Object o) {
       System.out.println("具体同事1发送消息:" + o);
       // 中介者转发
       mediator.relay(this, o);
   }
}

// 具体同事类2
class RealColleague2 extends Colleague {

   @Override
   public void receive(Object o) {
       System.out.println("具体同事2收到消息:" + o);
   }
   @Override
   public void send(Object o) {
       System.out.println("具体同事2发送消息:" + o);
       // 中介者转发
       mediator.relay(this, o);
   }
}
测试:
public class MediatorTest {
   public static void main(String[] args) {
       RealMediator realMediator = new RealMediator();
       RealColleague1 realColleague1 = new RealColleague1();
       RealColleague2 realColleague2 = new RealColleague2();
       realMediator.register(realColleague1);
       realMediator.register(realColleague2);

       realColleague1.send("后端接口开发完毕");
       realColleague2.send("收到!");
   }
}
备忘录模式 Memento
提供一种恢复状态的机制,使用户回到一个特定的历史时刻,即存储,读取
// 备忘录接口,对外提供窄接口
public interface Memento {
}

// 备忘录发起者(需要回滚的对象)
@Data
public class GameInfo {
   private int state;
   private String desc;

   // 初始化
   public void initState() {
       state = 0;
       desc = "开局";
   }

   // 修改状态
   public void passLevel() {
       state = 1;
       desc = "通关";
   }

   // 存储
   public Memento save() {
       return new StateMemento(state, desc);
   }

   // 读取
   public void load(Memento memento) {
       StateMemento stateMemento = (StateMemento)memento;
       this.state = stateMemento.state;
       this.desc = stateMemento.desc;
   }

   // 存储的内容
   @AllArgsConstructor
   @NoArgsConstructor
   @Data
   private class StateMemento implements Memento{
       private int state;
       private String desc;
   }
}

// 管理者
@Data
public class StateCaretaker {
   private Memento memento;
}
测试:
public class MementoTest {
   public static void main(String[] args) {
       GameInfo gameInfo = new GameInfo();
       // 初始化
       gameInfo.initState();
       System.out.println(gameInfo);
       // 备份
       StateCaretaker stateCaretaker = new StateCaretaker();
       stateCaretaker.setMemento(gameInfo.save());
       // 修改状态
       gameInfo.passLevel();
       System.out.println(gameInfo);
       // 恢复
       gameInfo.load(stateCaretaker.getMemento());
       System.out.println(gameInfo);
   }
}
状态模式 State
对有状态的对象,把复杂的判断逻辑提取到不同类来实现,允许状态对象在其内部发生改变时改变其行为
// 环境角色类
@Data
public class Context {
   public final static OpeningState OPENING_STATE = new OpeningState();
   public final static ClosingState CLOSING_STATE = new ClosingState();
   public final static RunningState RUNNING_STATE = new RunningState();
   public final static StoppingState STOPPING_STATE = new StoppingState();

   // 当前状态
   public LiftState liftState;

   public void setLiftState(LiftState liftState) {
       this.liftState = liftState;
       // 给当前状态设置context
       this.liftState.setContext(this);
   }
   public void open() {
       this.liftState.open();
   }
   public void close() {
       this.liftState.close();
   }
   public void run() {
       this.liftState.run();
   }
   public void stop() {
       this.liftState.stop();
   }
}

// 抽象状态类
@Data
public abstract class LiftState {
   protected Context context;
   // 电梯开启
   public abstract void open();
   // 关闭
   public abstract void close();
   // 运行
   public abstract void run();
   // 停止
   public abstract void stop();
}

// 具体状态:电梯门关闭状态类
public class ClosingState extends LiftState {

// 根据当前状态执行特定逻辑
   @Override
   public void open() {
       context.setLiftState(Context.OPENING_STATE);
       context.open();
   }
   @Override
   public void close() {
       System.out.println("电梯门关闭");
   }
   @Override
   public void run() {
       context.setLiftState(Context.RUNNING_STATE);
       context.run();
   }
   @Override
   public void stop() {
       context.setLiftState(Context.STOPPING_STATE);
       context.stop();
   }
}

// 具体状态:电梯门打开状态类
public class OpeningState extends LiftState {

   // 根据当前状态执行特定逻辑
   @Override
   public void open() {
       System.out.println("电梯开启");
   }
   @Override
   public void close() {
       // 修改状态
       context.setLiftState(Context.CLOSING_STATE);
       context.liftState.close();
   }
   @Override
   public void run() {
       // 电梯门开启状态不能运行
   }
   @Override
   public void stop() {
       // 电梯门开启状态不能运行
   }
}

// 以下省略... 电梯运行状态类 & 电梯停止状态类
测试:
public class StateTest {
   public static void main(String[] args) {
       Context context = new Context();
       context.setLiftState(Context.RUNNING_STATE);
       context.open();
       context.close();
       context.run();
       context.stop();
   }
}
命令模式 Command
将一个请求封装为对象,使发出请求的责任和执行请求的责任分离,二者通过命令交互,方便命令对象进行存储,传递,调用,增加
比如服务员 订单 厨师场景// 调用者,持有命令,调用命令的方法 @Data class Invoker { private Command command; public Invoker(Command command) { this.command = command; } public void call() { System.out.println("调用者调用命令"); command.execute(); } } // 抽象命令 interface Command { void execute(); } // 具体命令,持有接收者,调用接收者执行 class RealCommand implements Command { private Receiver receiver; RealCommand() { receiver = new Receiver(); } @Override public void execute() { receiver.action(); } } // 接收者 执行者 class Receiver { public void action() { System.out.println("接收者干事情"); }; }测试:
public class CommandTest {
   public static void main(String[] args) {
       Command command = new RealCommand();
       Invoker invoker = new Invoker(command);
       invoker.call();
   }
}
迭代器模式 Iterator
提供一个对象顺序访问聚合对象中的数据,不暴露聚合对象的内部表示
// 抽象聚合
interface Aggregate {
   public void add(Object o);
   public void remove(Object o);
   public MyIterator getIterator();
}

// 聚合实现
class RealAggregate implements Aggregate {

   private List<Object> list = new ArrayList<>();

   @Override
   public void add(Object o) {
       list.add(o);
   }
   @Override
   public void remove(Object o) {
       list.remove(o);
   }
   @Override
   public MyIterator getIterator() {
       return new RealIterator(list);
   }
}

// 抽象迭代器
interface MyIterator {
   Object first();
   Object next();
   boolean hasNext();
}

// 迭代器实现
class RealIterator implements MyIterator {

   private List<Object> list = null;

   private int index = -1;

   RealIterator(List<Object> list) {
       this.list = list;
   }

   @Override
   public Object first() {
       index = 0;
       return list.get(index);
   }
   @Override
   public Object next() {
       Object o = null;
       if (this.hasNext()) {
           o = list.get(++index);
       }
       return o;
   }
   @Override
   public boolean hasNext() {
       if (index < list.size() -1) {
           return true;
       } else {
           return false;
       }
   }
}
测试:
public class IteratorTest {
   public static void main(String[] args) {
       Aggregate aggregate = new RealAggregate();
       aggregate.add(1);
       aggregate.add(2);
       aggregate.add(5);
       // 遍历
       MyIterator iterator = aggregate.getIterator();
       while (iterator.hasNext()) {
           Object o = iterator.next();
           System.out.println(o);
       }
   }
}
访问者模式 Visitor
将数据结构和元素的操作分离,可以不改变数据结构去修改这些元素的新的操作
适合元素个数不变情况,它依赖具体类而不是抽象,违反开闭,依赖倒置// 抽象访问者 interface Visitor { void visit(RealElementA elementA); void visit(RealElementB elementB); } // 具体访问者A class RealVisitorA implements Visitor { @Override public void visit(RealElementA elementA) { System.out.println("访问者A访问"); System.out.println(elementA.operationA()); } @Override public void visit(RealElementB elementB) { System.out.println("访问者A访问"); System.out.println(elementB.operationB()); } } // 具体访问者B class RealVisitorB implements Visitor { @Override public void visit(RealElementA elementA) { System.out.println("访问者B访问"); System.out.println(elementA.operationA()); } @Override public void visit(RealElementB elementB) { System.out.println("访问者B访问"); System.out.println(elementB.operationB()); } } // 抽象元素 interface Element { void accept(Visitor visitor); } // 具体元素A class RealElementA implements Element { @Override public void accept(Visitor visitor) { visitor.visit(this); } public String operationA() { return "元素A被访问"; } } // 具体元素B class RealElementB implements Element { @Override public void accept(Visitor visitor) { visitor.visit(this); } public String operationB() { return "元素B被访问"; } } // 对象结构角色 class ObjectStructure { private List<Element> list = new ArrayList<>(); // 传递访问者,访问所有元素 public void accept(Visitor visitor) { Iterator<Element> iterator = list.iterator(); while (iterator.hasNext()) { iterator.next().accept(visitor); } } public void add(Element element) { list.add(element); }; public void remove(Element element) { list.remove(element); } }测试:
public class VisitorTest {
   public static void main(String[] args) {
       ObjectStructure objectStructure = new ObjectStructure();
       objectStructure.add(new RealElementA());
       objectStructure.add(new RealElementB());
       RealVisitorA realVisitorA = new RealVisitorA();
       objectStructure.accept(realVisitorA);
       System.out.println("==========================");
       RealVisitorB realVisitorB = new RealVisitorB();
       objectStructure.accept(realVisitorB);
   }
}
解释器模式 Interpreter
用编译语言的方式来分析应用中的实例
// 环境角色
public class Context {

   // 定义一个MAP集合,存储Variable变量,和它的值
   private Map<Variable, Integer> map = new HashMap<>();

   // 添加变量
   public void assign(Variable var, Integer value) {
       map.put(var, value);
   }
   // 获取变量的值
   public int getValue(Variable var) {
       return map.get(var);
   }
}

// 抽象表达式
public abstract class AbstractExpression {
   public abstract int interpret(Context context);
}

// 封装变量类
@Data
@AllArgsConstructor
public class Variable extends AbstractExpression{

   // 存储变量名的名字
   private String name;

   @Override
   public int interpret(Context context) {
       // 递归终点,返回变量的值
       return context.getValue(this);
   }
   @Override
   public String toString() {
       return name;
   }
}

// 加法表达式
@Data
@AllArgsConstructor
public class Plus extends AbstractExpression{
   // +号左边的表达式
   private AbstractExpression left;
   private AbstractExpression right;

   @Override
   public int interpret(Context context) {
       // 递归 将左边和右边相加
       return left.interpret(context) + right.interpret(context);
   }
   @Override
   public String toString() {
       return "(" + left.toString() + "+" + right.toString() + ")";
   }
}

// 减法表达式
@Data
@AllArgsConstructor
public class Minus extends AbstractExpression{
   // -号左边的表达式
   private AbstractExpression left;
   private AbstractExpression right;

   @Override
   public int interpret(Context context) {
       // 递归 将左边和右边相减
       return left.interpret(context) - right.interpret(context);
   }
   @Override
   public String toString() {
       return "(" + left.toString() + "-" + right.toString() + ")";
   }
}
测试:
public class InterpreterTest {
   public static void main(String[] args) {
       // 创建环境
       Context context = new Context();
       // 创建变量
       Variable a = new Variable("a");
       Variable b = new Variable("b");
       Variable c = new Variable("c");
       Variable d = new Variable("d");
       context.assign(a, 1);
       context.assign(b, 2);
       context.assign(c, 3);
       context.assign(d, 4);
       // 获取抽象语法树 : a+((b+c)-d)
       AbstractExpression expression = new Plus(a, new Minus(new Plus(b, c), d));
       // 解释,计算
       int result = expression.interpret(context);
       System.out.println(expression + " = " + result);
   }
}