RabbitMQ
消息队列
消息中间件,一个使用队列来通信的组件。
功能
异步处理
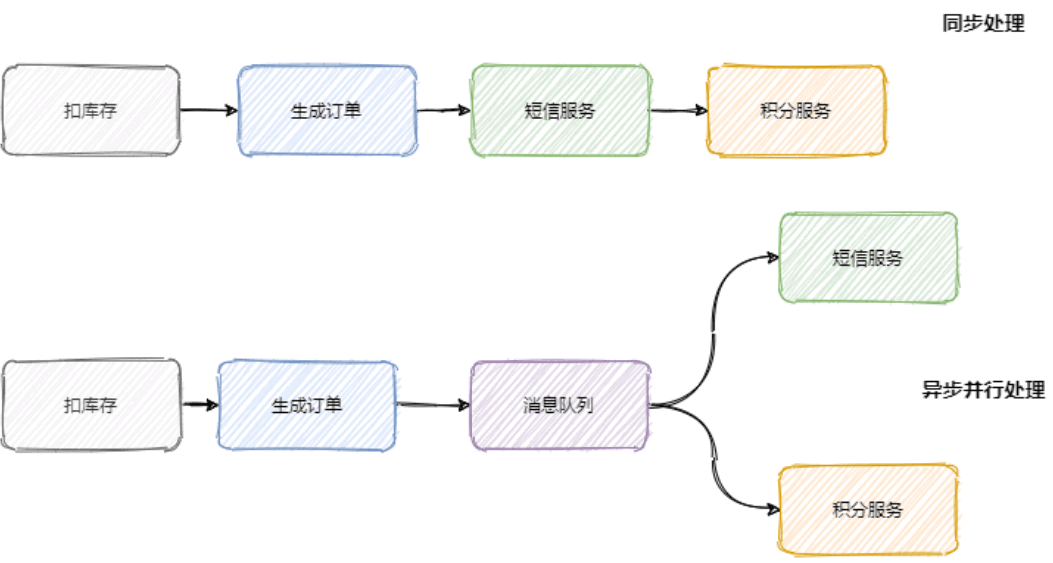
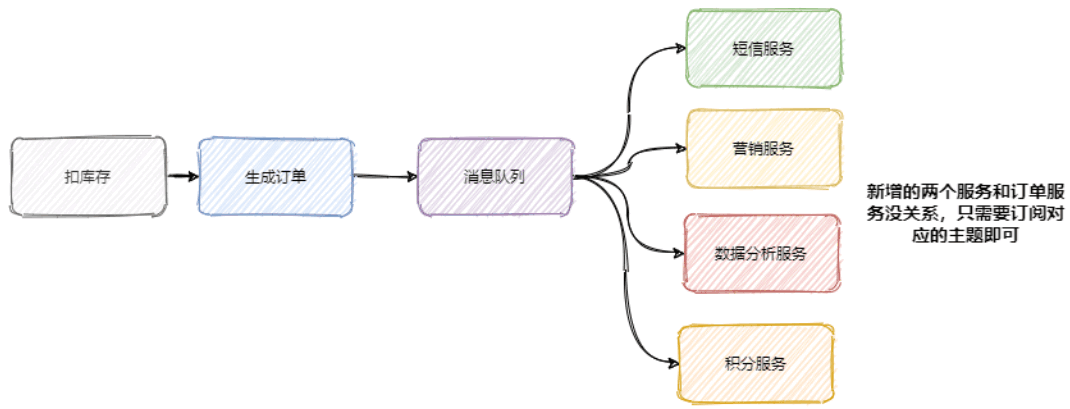
服务解耦
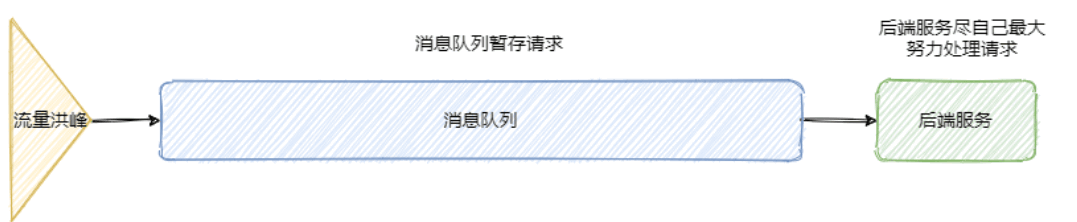
流量控制
Docker安装
docker pull rabbitmq:3.8.3-management
docker run -d --name rabbitmq -p 5672:5672 -p 15672:15672 -v /home/rabbit_docker:/var/lib/rabbitmq --hostname myRabbit -e RABBITMQ_DEFAULT_VHOST=my_vhost  -e RABBITMQ_DEFAULT_USER=admin -e RABBITMQ_DEFAULT_PASS=admin rabbitmq:3.8.3-management
-d 后台运行容器;
--name 指定容器名;
-p 指定服务运行的端口(5672:应用访问端口;15672:控制台Web端口号);
-v 映射目录或文件;
--hostname 主机名(RabbitMQ的一个重要注意事项是它根据所谓的 “节点名称” 存储数据,默认为主机名);
-e 指定环境变量;(RABBITMQ_DEFAULT_VHOST:默认虚拟机名;RABBITMQ_DEFAULT_USER:默认的用户名;
RABBITMQ_DEFAULT_PASS:默认用户名的密码)Windows下RabbitMQ安装及配置
安装Erlang
下载地址:https://www.erlang.org/downloads
设置环境变量,新建ERLANG_HOME 指向安装目录
修改环境变量path,增加Erlang变量至path,%ERLANG_HOME%\bin;
cmd输入erl,查看是否更改成功
安装rabbitmq
下载地址:http://www.rabbitmq.com/download.html
启动rabbitmq
浏览器访问http://localhost:15672,查看是否启动成功
输入账户密码进入后台管理界面,默认账户密码都是guest
后台管理界面可以手动创建虚拟host,创建用户,分配权限,创建交换机,创建队列等等,还有查看队列消息,消费效率,推送效率等等
概念
名词
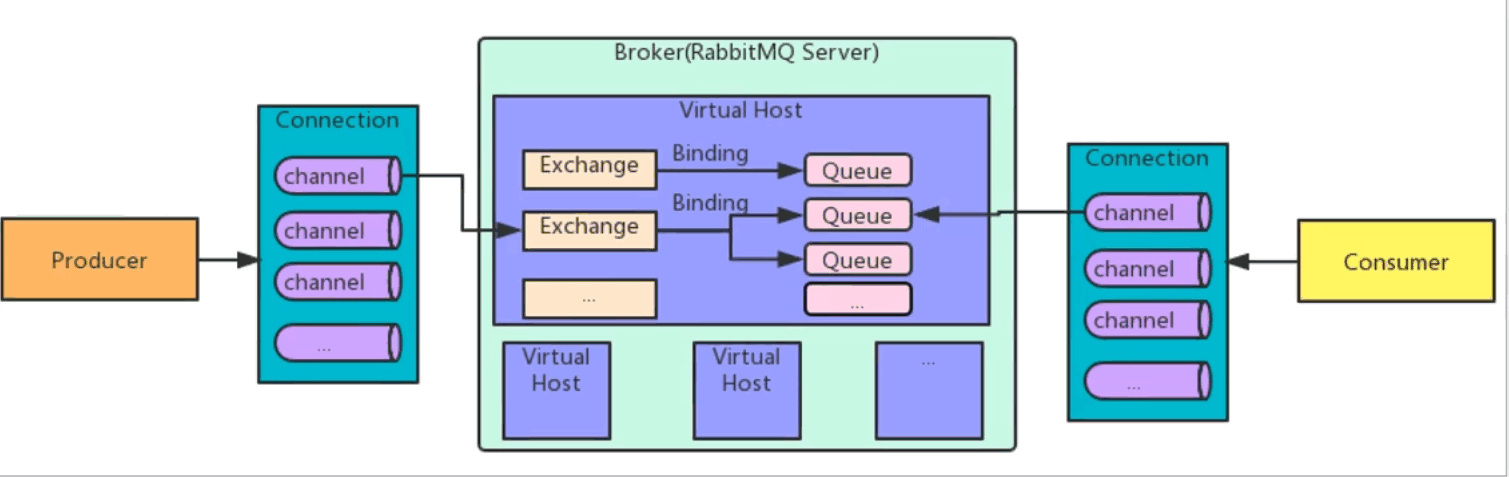
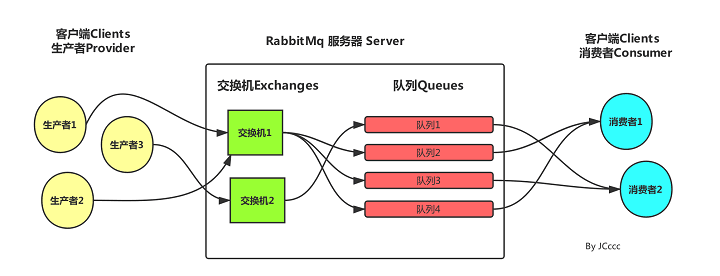
- Broker:接收分发消息,就是rabbitmq服务端
- Virtual host:出于多租户和安全考虑,分组,类似mysql中的database概念
- Connection:生产者,消费者和broker直接的tcp连接
- Channel:Channel是在Connection内部建立逻辑连接,减少建立TCP连接的开销,通常每个线程建立一个channel,channel之间完全隔离
- Exchange:消息到达broker中首先到达交换机,根据分发规则,匹配routing key,分发消息到queue中
- Queue:队列,存放消息地方,被消费者取走,FIFO
- Binding:exchange和queue之间的虚拟连接,Bingding信息被保存到exchange中的查询表中,用于消息分发依据
工作模式
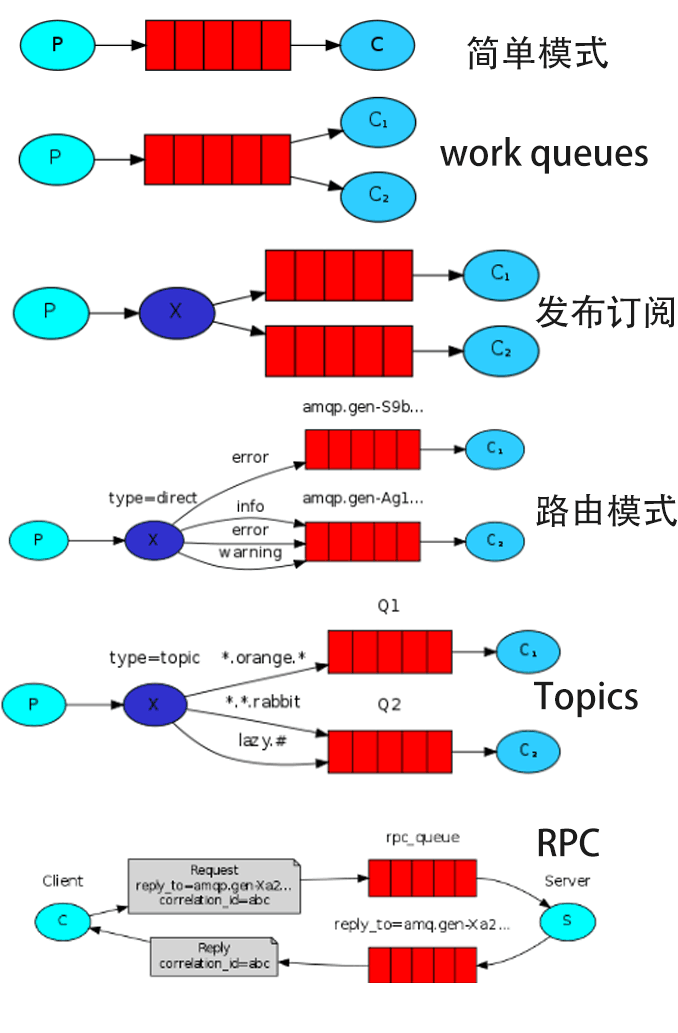
简单模式
生产者 -> MQ <- 消费者
一个生产者对应一个消费者
work queues工作队列模式
一个生产者对应多个消费者,多个消费者共同消费同一个队列中的消息
发布订阅模式
引入Fanout广播交换机,接收消息,处理消息分发给队列,把消息分发给所有绑定到交换机的队列
路由模式
Direct定向交换机,把消息交给符合指定routing key的队列,对消息做筛选
Topics主题模式
Topic交换机,把消息交给符合routing pattern路由模式的队列,路由key一般有一个或多个单词组成,单词之间用.隔开。#匹配多个单词:item.#(item.one.two, item.one) *匹配一个单词:(item.one)
RPC远程调用模式
rabbitmq代码实现
消息推送和接收流程
简单模式
<dependency>
       <groupId>com.rabbitmq</groupId>
       <artifactId>amqp-client</artifactId>
       <version>5.4.3</version>
   </dependency>
public class RabbitUtils {
private static ConnectionFactory connectionFactory = new ConnectionFactory();
static {
connectionFactory.setHost("192.168.31.8");
connectionFactory.setPort(5672);
connectionFactory.setUsername("zwq");
connectionFactory.setPassword("zwqzwq");
connectionFactory.setVirtualHost("test");
}
public static Connection getConnection() {
Connection connection = null;
try {
connection = connectionFactory.newConnection();
} catch (Exception e) {
throw new RuntimeException();
}
return connection;
}
}public class Producer {
public static void main(String[] args) throws IOException, TimeoutException {
// 获取TCP长连接
Connection connection = RabbitUtils.getConnection();
// 创建通道,相当于TCP中虚拟连接
Channel channel = connection.createChannel();
// 创建队列
// 1队列名称 2是否持久化,MQ退出消息就丢失 3是否私有化,false代表所有消费者都可以访问,true代表第一次拥有它的消费者才能一直使用
// 4是否自动删除,false代表连接停掉后不自动删除这个队列 5其它额外参数
channel.queueDeclare("helloWordQueue1", false, false, false, null);
String message = "this is message 1";
// 1交换机,简单模式不需要交换机 2队列名称 3额外设置信息 4消息(字节数组)
channel.basicPublish("", "helloWordQueue1", null, message.getBytes());
channel.close();
connection.close();
System.out.println("数据发送完毕");
}
}public class Consumer {
public static void main(String[] args) throws IOException, TimeoutException {
// 获取TCP长连接
Connection connection = RabbitUtils.getConnection();
// 创建通道,相当于TCP中虚拟连接
Channel channel = connection.createChannel();
// 创建队列
// 1队列名称 2是否持久化,MQ退出消息就丢失 3是否私有化,false代表所有消费者都可以访问,true代表第一次拥有它的消费者才能一直使用
// 4是否自动删除,false代表连接停掉后不自动删除这个队列 5其它额外参数
channel.queueDeclare("helloWordQueue1", false, false, false, null);
// 获取数据 1队列名称 2是否自动确认收到消息,false代表手动编程确认消息(MQ推荐手动) 3要传入DefaultConsumer实现类
channel.basicConsume("helloWordQueue1", false, new Reciver(channel));
}
}
class Reciver extends DefaultConsumer {
private Channel channel;
// 重写构造方法把通道传入
public Reciver(Channel channel) {
super(channel);
this.channel = channel;
}
@Override
public void handleDelivery(String consumerTag, Envelope envelope, AMQP.BasicProperties properties, byte[] body) throws IOException {
String message = new String(body);
System.out.println("消息:" + message);
System.out.println("消息tagId:" + envelope.getDeliveryTag());
// 确认消息,false代表只确认当前消息,true代表签收该消费者所有未签收的消息
channel.basicAck(envelope.getDeliveryTag(), false);
}
}工作队列模式
// 生产者
public class OrderSystem {

    public static void main(String[] args) throws IOException, TimeoutException {
        Connection connection = RabbitUtils.getConnection();
        // 创建通道,相当于TCP中虚拟连接
        Channel channel = connection.createChannel();
        // 创建队列
        channel.queueDeclare("WorkQueue1", false, false, false, null);
        String message = "phone:14523123,name:zzz,message:hello ";
        for (int i = 0; i < 100; i++) {
            String send = message + i;
            // 1交换机,工作队列模式不需要交换机 2队列名称 3额外设置信息 4消息(字节数组)
            channel.basicPublish("", "WorkQueue1", null, send.getBytes());
        }
        System.out.println("数据发送完毕");
        channel.close();
        connection.close();
    }
}
// 这里写多个消费者去消费
public class SMSSystem1 {
public static void main(String[] args) throws IOException, TimeoutException {
// 获取TCP长连接
Connection connection = RabbitUtils.getConnection();
// 创建通道,相当于TCP中虚拟连接
Channel channel = connection.createChannel();
// 创建队列
channel.queueDeclare("WorkQueue1", false, false, false, null);
// 不加这个MQ是平均分配,加了之后消费者处理(确认消息)完一个后继续处理
channel.basicQos(1);
// 获取数据 1队列名称 2是否自动确认收到消息,false代表手动编程确认消息(MQ推荐手动) 3要传入DefaultConsumer实现类
channel.basicConsume("WorkQueue1", false, new DefaultConsumer(channel) {
@SneakyThrows
@Override
public void handleDelivery(String consumerTag, Envelope envelope, AMQP.BasicProperties properties, byte[] body) throws IOException {
String message = new String(body);
Thread.sleep(10);
System.out.println("短信系统1 -> 消费消息:" + message);
// 确认消息,false代表只确认当前消息,true代表签收该消费者所有未签收的消息
channel.basicAck(envelope.getDeliveryTag(), false);
}
});
}
}发布订阅模式
- 使用fanout交换机
public class PubSystem {
    public static void main(String[] args) throws IOException, TimeoutException {
        Connection connection = RabbitUtils.getConnection();
        // 创建通道,相当于TCP中虚拟连接
        Channel channel = connection.createChannel();
        String send = "发布订阅模式信息";
        // 1交换机 2队列名称 3额外设置信息 4消息(字节数组)
        // 需要在rabbit创建pubExchange这个交换机
        channel.basicPublish("pubExchange", "", null, send.getBytes());
        channel.close();
        connection.close();
    }
}
public class Sub1 { public static void main(String[] args) throws IOException { // 获取TCP长连接 Connection connection = RabbitUtils.getConnection(); // 创建通道,相当于TCP中虚拟连接 Channel channel = connection.createChannel(); // 创建队列 channel.queueDeclare("subQueue1", false, false, false, null); // 绑定交换机 1队列名字 2交换机名字 3路由key,发布订阅模式用不到 channel.queueBind("subQueue1", "pubExchange", ""); // 不加这个MQ是平均分配,加了之后消费者处理(确认消息)完一个后继续处理 channel.basicQos(1); // 获取数据 1队列名称 2是否自动确认收到消息,false代表手动编程确认消息(MQ推荐手动) 3要传入DefaultConsumer实现类 channel.basicConsume("subQueue1", false, new DefaultConsumer(channel) { @SneakyThrows @Override public void handleDelivery(String consumerTag, Envelope envelope, AMQP.BasicProperties properties, byte[] body) throws IOException { String message = new String(body); Thread.sleep(10); System.out.println("订阅1 -> 消费消息:" + message); channel.basicAck(envelope.getDeliveryTag(), false); } }); } }
路由模式
- 使用direct交换机
public class RoutingSystem {
    public static void main(String[] args) throws IOException, TimeoutException {
        Map map = new LinkedHashMap<String, String>();
        map.put("chongqing", "重庆天气预报");
        map.put("hunan", "湖南天气预报");
        map.put("beijing", "北京天气预报");
        map.put("xinjiang", "新疆天气预报");
        Connection connection = RabbitUtils.getConnection();
        // 创建通道,相当于TCP中虚拟连接
        Channel channel = connection.createChannel();
        Iterator<Map.Entry<String, String>> itr = map.entrySet().iterator();
        while (itr.hasNext()) {
            Map.Entry<String, String> temp = itr.next();
            // 1交换机 2路由key 3额外设置信息 4消息(字节数组)
            // 消息带有标记
            channel.basicPublish("routingExchange", temp.getKey(), null, temp.getValue().getBytes());
        }
        channel.close();
        connection.close();
    }
}
public class RoutingConsumer1 { public static void main(String[] args) throws IOException { // 获取TCP长连接 Connection connection = RabbitUtils.getConnection(); // 创建通道,相当于TCP中虚拟连接 Channel channel = connection.createChannel(); // 创建队列 channel.queueDeclare("routingQueue1", false, false, false, null); // 绑定交换机 1队列名字 2交换机名字 3路由key,发布订阅模式用不到 channel.queueBind("routingQueue1", "routingExchange", "chongqing"); // 不加这个MQ是平均分配,加了之后消费者处理(确认消息)完一个后继续处理 channel.basicQos(1); // 获取数据 1队列名称 2是否自动确认收到消息,false代表手动编程确认消息(MQ推荐手动) 3要传入DefaultConsumer实现类 channel.basicConsume("routingQueue1", false, new DefaultConsumer(channel) { @SneakyThrows @Override public void handleDelivery(String consumerTag, Envelope envelope, AMQP.BasicProperties properties, byte[] body) throws IOException { String message = new String(body); Thread.sleep(10); System.out.println("路由1 -> 消费chongqing消息:" + message); channel.basicAck(envelope.getDeliveryTag(), false); } }); } }public class RoutingConsumer2 { public static void main(String[] args) throws IOException { // 获取TCP长连接 Connection connection = RabbitUtils.getConnection(); // 创建通道,相当于TCP中虚拟连接 Channel channel = connection.createChannel(); // 创建队列 channel.queueDeclare("routingQueue2", false, false, false, null); // 绑定交换机 1队列名字 2交换机名字 3路由key,发布订阅模式用不到 channel.queueBind("routingQueue2", "routingExchange", "chongqing"); channel.queueBind("routingQueue2", "routingExchange", "beijing"); channel.queueBind("routingQueue2", "routingExchange", "hunan"); channel.queueBind("routingQueue2", "routingExchange", "none"); // 不加这个MQ是平均分配,加了之后消费者处理(确认消息)完一个后继续处理 channel.basicQos(1); // 获取数据 1队列名称 2是否自动确认收到消息,false代表手动编程确认消息(MQ推荐手动) 3要传入DefaultConsumer实现类 channel.basicConsume("routingQueue2", false, new DefaultConsumer(channel) { @SneakyThrows @Override public void handleDelivery(String consumerTag, Envelope envelope, AMQP.BasicProperties properties, byte[] body) throws IOException { String message = new String(body); Thread.sleep(10); System.out.println("路由2 -> 消费重庆北京湖南none消息:" + message); channel.basicAck(envelope.getDeliveryTag(), false); } }); } }
通配符模式
- 使用topic交换机
public class TopicSystem {
    public static void main(String[] args) throws IOException, TimeoutException {
        Map map = new LinkedHashMap<String, String>();
        map.put("aa.chongqing.now", "重庆天气预报");
        map.put("cc.hunan.future", "湖南天气预报");
        map.put("aa.beijing.future", "北京天气预报");
        map.put("cc.xinjiang.now", "新疆天气预报");
        Connection connection = RabbitUtils.getConnection();
        // 创建通道,相当于TCP中虚拟连接
        Channel channel = connection.createChannel();
        Iterator<Map.Entry<String, String>> itr = map.entrySet().iterator();
        while (itr.hasNext()) {
            Map.Entry<String, String> temp = itr.next();
            // 1交换机 2路由key 3额外设置信息 4消息(字节数组)
            // 消息带有标记
            channel.basicPublish("topicExchange", temp.getKey(), null, temp.getValue().getBytes());
        }
        channel.close();
        connection.close();
    }
}
public class TopicConsumer1 { public static void main(String[] args) throws IOException { // 获取TCP长连接 Connection connection = RabbitUtils.getConnection(); // 创建通道,相当于TCP中虚拟连接 Channel channel = connection.createChannel(); // 创建队列 channel.queueDeclare("topicQueue1", false, false, false, null); // 绑定交换机 1队列名字 2交换机名字 3路由key,发布订阅模式用不到 channel.queueBind("topicQueue1", "topicExchange", "*.*.now"); // 不加这个MQ是平均分配,加了之后消费者处理(确认消息)完一个后继续处理 channel.basicQos(1); // 获取数据 1队列名称 2是否自动确认收到消息,false代表手动编程确认消息(MQ推荐手动) 3要传入DefaultConsumer实现类 channel.basicConsume("topicQueue1", false, new DefaultConsumer(channel) { @SneakyThrows @Override public void handleDelivery(String consumerTag, Envelope envelope, AMQP.BasicProperties properties, byte[] body) throws IOException { String message = new String(body); Thread.sleep(10); System.out.println("通配符1 -> 消费*.*.now消息:" + message); channel.basicAck(envelope.getDeliveryTag(), false); } }); } }public class TopicConsumer2 { public static void main(String[] args) throws IOException { // 获取TCP长连接 Connection connection = RabbitUtils.getConnection(); // 创建通道,相当于TCP中虚拟连接 Channel channel = connection.createChannel(); // 创建队列 channel.queueDeclare("topicQueue2", false, false, false, null); // 绑定交换机 1队列名字 2交换机名字 3路由key,发布订阅模式用不到 channel.queueBind("topicQueue2", "topicExchange", "cc.#"); // 不加这个MQ是平均分配,加了之后消费者处理(确认消息)完一个后继续处理 channel.basicQos(1); // 获取数据 1队列名称 2是否自动确认收到消息,false代表手动编程确认消息(MQ推荐手动) 3要传入DefaultConsumer实现类 channel.basicConsume("topicQueue2", false, new DefaultConsumer(channel) { @SneakyThrows @Override public void handleDelivery(String consumerTag, Envelope envelope, AMQP.BasicProperties properties, byte[] body) throws IOException { String message = new String(body); Thread.sleep(10); System.out.println("通配符2 -> 消费cc.#消息:" + message); channel.basicAck(envelope.getDeliveryTag(), false); } }); } }
消息确认机制
rabbitmq提供监听器来接收消息投递的状态,消息确认涉及两种状态Confirm Return(代表生产者和broker之间的投递关系,与消费者是否确认消息无关)
- confirm:代表生产者将消息送到broker有两种状态:1ack:代表broker已经接收消息 2nack:broker拒收消息(队列满,限流,IO异常)
- return:消息被broker正常接收ack后,但没有队列消费,消息会回退给生产者
public class TopicSystem {
    public static void main(String[] args) throws IOException, TimeoutException {
        Map map = new LinkedHashMap<String, String>();
        map.put("aa.chongqing.now", "重庆天气预报");
        map.put("cc.hunan.future", "湖南天气预报");
        map.put("aa.beijing.future", "北京天气预报");
        map.put("cc.xinjiang.now", "新疆天气预报");
        Connection connection = RabbitUtils.getConnection();
        // 创建通道,相当于TCP中虚拟连接
        Channel channel = connection.createChannel();
        // 开启监听模式
        channel.confirmSelect();
        channel.addConfirmListener(new ConfirmListener() {
            @Override
            public void handleAck(long l, boolean b) throws IOException {
                // l:tag,b:接收的数据是否为批量接收
                System.out.println("消息已被接收:tag:" + l);
            }
            @Override
            public void handleNack(long l, boolean b) throws IOException {
                System.out.println("消息已被broker拒收,tag:" + l);
            }
        });
        channel.addReturnListener(new ReturnCallback() {
            @Override
            public void handle(Return r) {
                System.out.println("Return编码:" + r.getReplyCode() + "描述:" + r.getReplyText());
                System.out.println("交换机:" + r.getExchange() + "路由key:" + r.getRoutingKey());
                System.out.println("return主题:" + new String(r.getBody()));
            }
        });
        Iterator<Map.Entry<String, String>> itr = map.entrySet().iterator();
        while (itr.hasNext()) {
            Map.Entry<String, String> temp = itr.next();
            // 1交换机 2路由key 3额外设置信息 4消息(字节数组)
            // 消息带有标记
            channel.basicPublish("topicExchange", temp.getKey(), true, null, temp.getValue().getBytes());
        }
    }
}
springboot
配置
<!--rabbitmq springboot starter-->
<dependency>
	<groupId>org.springframework.boot</groupId>
	<artifactId>spring-boot-starter-amqp</artifactId>
</dependency>
spring:
#配置rabbitMq 服务器
rabbitmq:
host: 192.168.31.8
port: 5672
username: zzz
password: zzzzzz
virtual-host: test生产者
- 配置
@Configuration public class RabbitConfig { /** * 交换机名字 */ public static final String EXCHANGE_NAME = "boot_topic_exchange"; /** * 队列名字 */ public static final String QUEUE_NAME = "boot_queue"; /** * description: 声明交换机 */ @Bean("bootExchange") public Exchange bootExchange() { return ExchangeBuilder.topicExchange(EXCHANGE_NAME).durable(true).build(); } /** * description: 声明队列 */ @Bean("bootQueue") public Queue bootQueue() { return QueueBuilder.durable(QUEUE_NAME).build(); } /** * description: 队列与交换机绑定 */ @Bean public Binding bindQueueExchange(@Qualifier("bootQueue") Queue queue, @Qualifier("bootExchange") Exchange exchange) { return BindingBuilder.bind(queue).to(exchange).with("boot.#").noargs(); } } - 发送消息
@SpringBootTest
@RunWith(SpringRunner.class)
class RabbitProducerApplicationTests {
    @Autowired
    private RabbitTemplate rabbitTemplate;
    @Test
    void send() {
        rabbitTemplate.convertAndSend(RabbitConfig.EXCHANGE_NAME, "boot.zzz", "springboot rabbit message");
    }
}
消费者
@Component
public class MyRabbitListener {
    /**
     * description: 信息监听,监听哪个队列
     */
    @RabbitListener(queues = "boot_queue")
    public void ListenerQueue(Message message) {
        System.out.println(message);
    }

}
保证消息可靠
- 保证broker高可用,搭集群
- exchange要持久化
- queue要持久化
- message要持久化
- 生产者confirm
- 消费者ack
- 生产者
spring:
  #配置rabbitMq 服务器
  rabbitmq:
    publisher-confirm-type: correlated # 消息从生产者发送到交换机后触发回调方法
@SpringBootTest @RunWith(SpringRunner.class) class RabbitProducerApplicationTests { @Autowired private RabbitTemplate rabbitTemplate; @Test void send() throws InterruptedException { // 定义回调,消息无法到达交换机时会回调 rabbitTemplate.setConfirmCallback(new RabbitTemplate.ConfirmCallback() { /** * description: correlationData相关配置信息 b是否接收成功 s失败原因 */ @Override public void confirm(CorrelationData correlationData, boolean b, String s) { if (b) { System.out.println(correlationData); System.out.println("发送成功"); // 接收成功 } else { System.out.println(correlationData); System.out.println("发送失败:" + s); // 失败,重新发送 } } }); // 设置处理失败消息模式,true:消息到不了队列,会返回给生产者 rabbitTemplate.setMandatory(true); rabbitTemplate.setReturnsCallback(new RabbitTemplate.ReturnsCallback() { @Override public void returnedMessage(ReturnedMessage returnedMessage) { System.out.println("没有队列绑定"); System.out.println("Return编码:" + returnedMessage.getReplyCode() + "描述:" + returnedMessage.getReplyText()); System.out.println("交换机:" + returnedMessage.getExchange() + "路由key:" + returnedMessage.getRoutingKey()); System.out.println("return主题:" + new String(returnedMessage.getMessage().getBody())); } }); rabbitTemplate.convertAndSend(RabbitConfig.EXCHANGE_NAME, "boot.zzz", "springboot rabbit message"); Thread.sleep(1000); } } - 消费者
@Configuration
public class RabbitConfig {

    @Resource
    SimpleRabbitListenerContainerFactory simpleRabbitListenerContainerFactory;

    @Bean
    public SimpleMessageListenerContainer SimpleRabbitListenerContainerFactory() {
        SimpleMessageListenerContainer simpleMessageListenerContainer =
                simpleRabbitListenerContainerFactory.createListenerContainer();
        simpleMessageListenerContainer.setQueueNames("boot_queue");
        // 可以动态修改接收消息模式
        // simpleMessageListenerContainer.removeQueueNames("boot_queue.*.a");
        // 设置多个并发消费者一起消费,并支持运行时动态修改
        simpleMessageListenerContainer.setConcurrentConsumers(1);
        // 设置最大消费者5
        simpleMessageListenerContainer.setMaxConcurrentConsumers(5);
        //设置是否重回队列
        // simpleMessageListenerContainer.setDefaultRequeueRejected(false);
        // 设置手动签收
        simpleMessageListenerContainer.setAcknowledgeMode(AcknowledgeMode.MANUAL);
        //设置监听外露
        simpleMessageListenerContainer.setExposeListenerChannel(true);
        // 将实现了ChannelAwareMessageListener接口的MyConsumer类的实例传进setMessageListener中
        simpleMessageListenerContainer.setMessageListener(new AckListener());
        return simpleMessageListenerContainer;

    }
}
@Component public class AckListener implements ChannelAwareMessageListener { @Override public void onMessage(Message message, Channel channel) throws Exception { // 消息ID long tag = message.getMessageProperties().getDeliveryTag(); try { System.out.println(message); // 这里报错消息重回队列 int i = 1 / 0; // 确认消息,false代表只确认当前消息,true代表签收该消费者所有未签收的消息 channel.basicAck(tag, true); // 可以利用redis存储重试次数,次数上限停止重试,再把消息缓存起来 } catch (Exception e) { System.out.println("异常"); // 最后一个参数:true:重回队列,false:消息丢弃 channel.basicNack(tag, true, true); } } }
消费限流
消费端模式一定为手动确认模式AcknowledgeMode.MANUAL
spring:
  rabbitmq:
    listener:
      simple:
        prefetch: 2 # 消费端每个线程每次拉去2条数据,直到确认消费完毕才拉去下2条
延迟队列
消息进入队列不会立即消费,到达指定时间后消费
场景:下单30min未支付,取消订单,回滚库存
场景:新用户注册7天,发送短信
实现:定时器,延迟队列
rabbitmq是实现延迟队列需要:TTL + 死信队列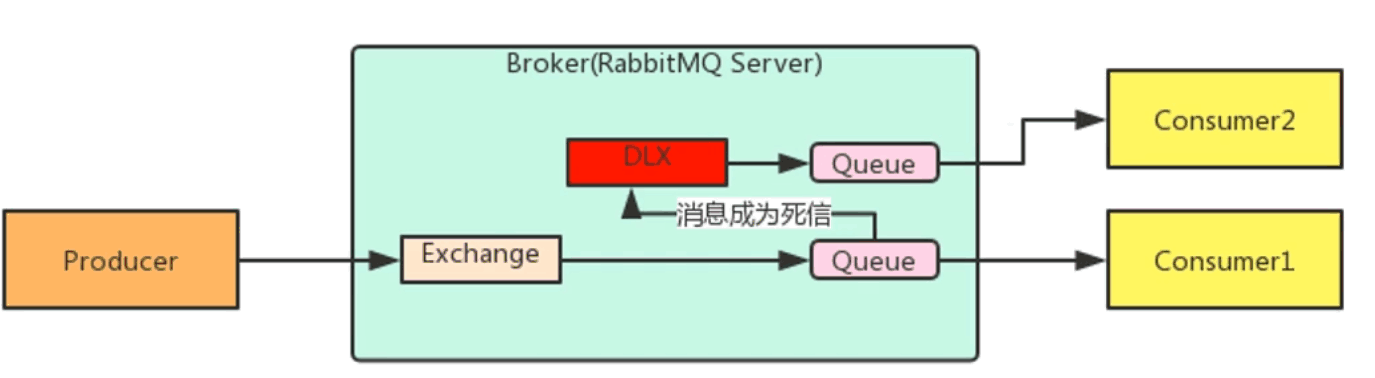
TTL
存活时间/过期时间
消息到达存活时间还没有被消费,就会自动清除
rabbitmq可以对消息设置存活时间,也可以对queue设置存活时间
/**
    * ttl交换机
    */
   @Bean("ttlExchange")
   public Exchange ttlExchange() {
       return ExchangeBuilder.topicExchange("ttl_exchange").durable(true).build();
   }
   /**
    * 配置队列的时候顺带上ttl()方法 其内部对MQ设置了参数"x-message-ttl"
    * 单位是毫秒
    */
   @Bean("ttlQueue")
   public Queue ttlQueue(){
       return QueueBuilder.durable("ttl_queue").ttl(10000).build();
   }
   /**
    * description: 队列与交换机绑定
    */
   @Bean
   public Binding bindTtlQueueExchange(@Qualifier("ttlQueue") Queue queue, @Qualifier("ttlExchange") Exchange exchange) {
       return BindingBuilder.bind(queue).to(exchange).with("ttl.#").noargs();
   }
// 这些消息只能存活10S
for (int i = 0; i < 100; i++) {
rabbitTemplate.convertAndSend("ttl_exchange", "ttl.zzz", "ttl rabbit message");
}死信队列
死信队列DLX:rabbitmq叫死信交换机:当消息成为dead message后,可以被重新发送到另一个交换机,这个交换机就是死信交换机
如果配置了死信队列,之前会被丢弃的信息会放到 -> 死信交换机
成为死信三种情况
- 队列消息长度达到限制
- 消费者拒收消息,并且不重回队列
- 原队列存在消息过期设置,消息到达超时时间未被消费
- 配置死信队列
/** * 死信队列 */ @Bean("deadQueue") public Queue deadLetterQueue(){ return QueueBuilder.durable("dead_queue").build(); } /** * 死信交换机 */ @Bean("deadExchange") public DirectExchange deadLetterExchange(){ return ExchangeBuilder.directExchange("dead_exchange").durable(true).build(); } /** * 死信队列绑定 */ @Bean public Binding bindDeadQueueExchange(@Qualifier("deadQueue") Queue queue, @Qualifier("deadExchange") Exchange exchange) { return BindingBuilder.bind(queue).to(exchange).with("dead.#").noargs(); } - 配置TTL队列,需要把队列绑定到死信交换机
/**
    * ttl交换机
    */
   @Bean("ttlExchange")
   public Exchange ttlExchange() {
       return ExchangeBuilder.topicExchange("ttl_exchange").durable(true).build();
   }

   /**
    * ttl队列,配置队列的时候顺带上ttl()方法 其内部对MQ设置了参数"x-message-ttl"
    */
   @Bean("ttlQueue")
   public Queue ttlQueue(){
       HashMap<String, Object> map = new HashMap<>(2);
       // 配置当前队列绑定的死信交换器
       map.put("x-dead-letter-exchange", "dead_exchange");
       // 配置当前队列的死信队列路由key,如果不设置默认为当前队列的路由key
       map.put("x-dead-letter-routing-key", "dead.#");
       return QueueBuilder.durable("ttl_queue").ttl(10000).withArguments(map).build();
   }

   /**
    * description: 队列与交换机绑定
    */
   @Bean
   public Binding bindTtlQueueExchange(@Qualifier("ttlQueue") Queue queue, @Qualifier("ttlExchange") Exchange exchange) {
       return BindingBuilder.bind(queue).to(exchange).with("ttl.#").noargs();
   }
实现延迟队列
TTL队列绑定死信交换机,监听死信队列即可
TTL过期时间就是延迟时间
@Component
public class MyRabbitListener {
    /**
     * description: 信息监听,监听哪个队列
     */
    @RabbitListener(queues = "dead_queue")
    public void ListenerQueue(Message message) {
        System.out.println("DEAD_MESSAGE:" + message);
    }
}
消息积压
消费者宕机,消费者能力不足
解决:上线更多消费者,把消息取出放到数据库,然后慢慢处理
消息幂等性保障
消费多条相同的消息,得到与消费该消息一次相同的结果
可以使用乐观锁机制实现,更新数据时判断version
集群
rabbit集群
- 启动
docker run -d --name rabbit1 -p 5672:5672 -p 15672:15672 -v /home/rabbit_docker/node1:/var/lib/rabbitmq --hostname myRabbit1 -e RABBITMQ_DEFAULT_VHOST=my_vhost -e RABBITMQ_DEFAULT_USER=admin -e RABBITMQ_DEFAULT_PASS=admin -e RABBITMQ_ERLANG_COOKIE='rabbitcookie' rabbitmq:3.8.3-management docker run -d --name rabbit2 -p 5673:5672 -p 15673:15672 -v /home/rabbit_docker/node2:/var/lib/rabbitmq --hostname myRabbit2 -e RABBITMQ_DEFAULT_VHOST=my_vhost -e RABBITMQ_DEFAULT_USER=admin -e RABBITMQ_DEFAULT_PASS=admin -e RABBITMQ_ERLANG_COOKIE='rabbitcookie' --link rabbit1:myRabbit1 rabbitmq:3.8.3-management - 加入集群节点
进入节点2把它加入节点1node2: docker exec -it rabbit2 bash rabbitmqctl stop_app rabbitmqctl reset rabbitmqctl join_cluster --ram rabbit@myRabbit1 rabbitmqctl start_app exit如果需要移除节点 rabbitmqctl forget_cluster_node rabbit@myRabbit2
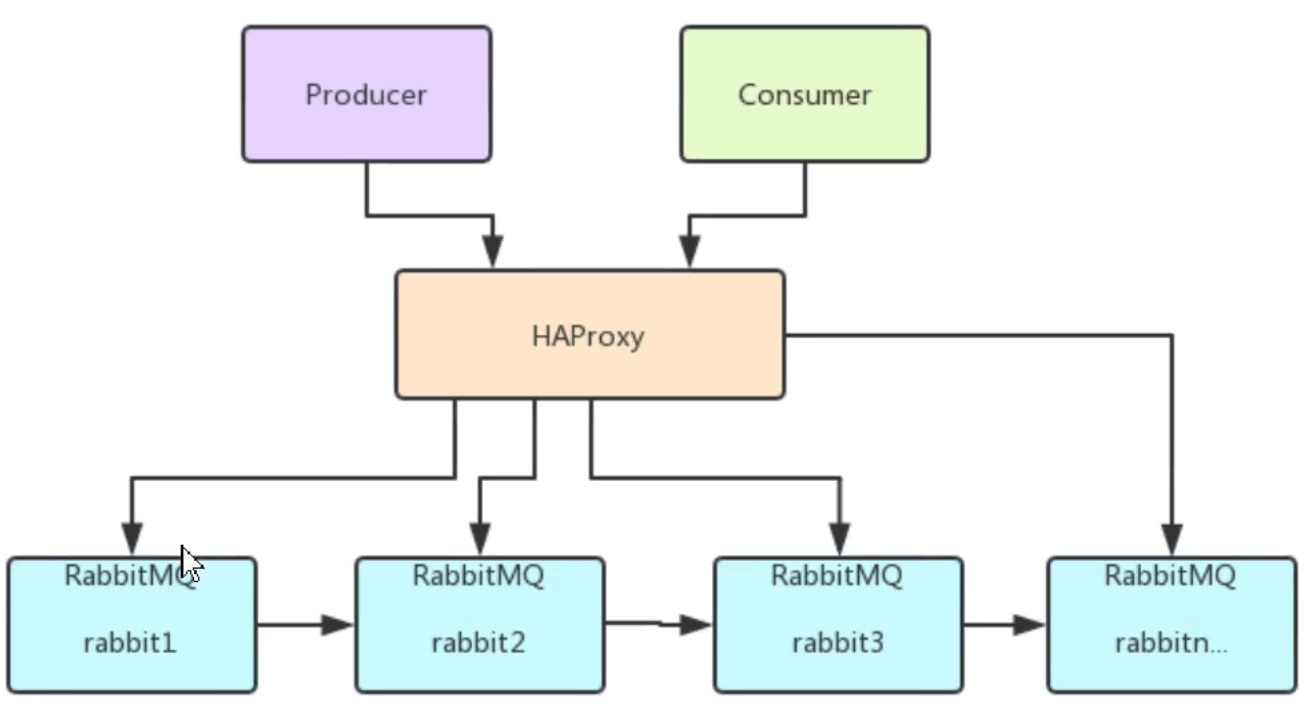
HAProxy负载均衡
yum install haproxy
vim /etc/haproxy/haproxy.cfg
systemctl start haproxy
haproxy.cfg:
global
    log         127.0.0.1 local2
    chroot      /var/lib/haproxy
    pidfile     /var/run/haproxy.pid
    maxconn     4000
    user        haproxy
	group       haproxy
    daemon
    # turn on stats unix socket
    stats socket /var/lib/haproxy/stats
#---------------------------------------------------------------------
# common defaults that all the 'listen' and 'backend' sections will
# use if not designated in their block
#---------------------------------------------------------------------
defaults
    mode                    http
    log                     global
    option                  httplog
    option                  dontlognull
    option http-server-close
    option forwardfor       except 127.0.0.0/8
    option                  redispatch
    retries                 3
    timeout http-request    10s
    timeout queue           1m
    timeout connect         10s
    timeout client          1m
    timeout server          1m
    timeout http-keep-alive 10s
    timeout check           10s
    maxconn                 3000

listen rabbitmq_cluster
    bind 0.0.0.0:5680 #通过5680对两个节点映射
	option tcplog #记录tcp连接状态和时间
    mode tcp #配置TCP模式
	option clitcpka #开启tcp keep alive长连接模式
	timeout connect 1s # haproxy与mq建立连接超时时间
	timeout client 10s # 客户端与haproxy最大空闲时间
    balance roundrobin #简单的轮询
    # rabbitmq集群节点配置
    # inter 每隔五秒对mq集群做健康检查,2次正确证明服务器可用,2次失败证明服务器不可用,并且配置主备机制
    server rabbit1 192.168.31.8:5672 check inter 5000 rise 2 fall 2
    server rabbit2 192.168.31.8:5673 check inter 5000 rise 2 fall 2
#配置haproxy web监控,查看统计信息
listen http_front
    bind 0.0.0.0:1080
    stats refresh 30s
	stats uri /haproxy_stats
	stats auth admin:admin
如果启动不了can not bind …socket
绑定非本机的IP需要在sysctl.conf文件中添加配置: net.ipv4.ip_nonlocal_bind=1
vi /etc/sysctl.conf
sysctl -p
如果还是不行可能是selinux的问题
关闭selinux
setenforce 0
监控地址:
http://192.168.31.8:1080/haproxy_stats
集群地址:
192.168.31.8:5680