SpringCloud Config
本地读取配置文件
- 新建maven工程,前面几次文章有提到。pom.xml:
<?xml version="1.0" encoding="UTF-8"?> <project xmlns="http://maven.apache.org/POM/4.0.0" xmlns:xsi="http://www.w3.org/2001/XMLSchema-instance" xsi:schemaLocation="http://maven.apache.org/POM/4.0.0 http://maven.apache.org/xsd/maven-4.0.0.xsd"> <modelVersion>4.0.0</modelVersion> <groupId>org.zwq</groupId> <artifactId>cloud-config</artifactId> <version>1.0-SNAPSHOT</version> <packaging>pom</packaging> <parent> <groupId>org.springframework.boot</groupId> <artifactId>spring-boot-starter-parent</artifactId> <version>1.5.2.RELEASE</version> <relativePath/> <!-- lookup parent from repository --> </parent> <properties> <project.build.sourceEncoding>UTF-8</project.build.sourceEncoding> <project.reporting.outputEncoding>UTF-8</project.reporting.outputEncoding> <java.version>1.8</java.version> <spring-cloud.version>Dalston.RELEASE</spring-cloud.version> </properties> <dependencies> <dependency> <groupId>org.springframework.boot</groupId> <artifactId>spring-boot-starter-test</artifactId> <scope>test</scope> </dependency> </dependencies> <dependencyManagement> <dependencies> <dependency> <groupId>org.springframework.cloud</groupId> <artifactId>spring-cloud-dependencies</artifactId> <version>${spring-cloud.version}</version> <type>pom</type> <scope>import</scope> </dependency> </dependencies> </dependencyManagement> </project> - 在主工程里面创建config-server module工程。
配置pom.xml文件:<?xml version="1.0" encoding="UTF-8"?> <project xmlns="http://maven.apache.org/POM/4.0.0" xmlns:xsi="http://www.w3.org/2001/XMLSchema-instance" xsi:schemaLocation="http://maven.apache.org/POM/4.0.0 https://maven.apache.org/xsd/maven-4.0.0.xsd"> <modelVersion>4.0.0</modelVersion> <parent> <groupId>org.zwq</groupId> <artifactId>cloud-config</artifactId> <version>1.0-SNAPSHOT</version> <relativePath/> <!-- lookup parent from repository --> </parent> <groupId>com.zwq</groupId> <artifactId>config-server</artifactId> <version>0.0.1-SNAPSHOT</version> <name>config-server</name> <description>Demo project for Spring Boot</description> <properties> <java.version>1.8</java.version> </properties> <dependencies> <dependency> <groupId>org.springframework.cloud</groupId> <artifactId>spring-cloud-config-server</artifactId> </dependency> <dependency> <groupId>org.springframework.boot</groupId> <artifactId>spring-boot-starter-test</artifactId> <scope>test</scope> </dependency> </dependencies> <build> <plugins> <plugin> <groupId>org.springframework.boot</groupId> <artifactId>spring-boot-maven-plugin</artifactId> </plugin> </plugins> </build> </project>
在启动类上加上@EnableConfigServer注解,开启ConfigServer功能。
配置application.yml文件:spring: cloud: config: server: native: search-locations: classpath:/shared #配置 Config Server 本地读取配置,路径 profiles: active: native application: name: config-server server: port: 8769
然后在工程的 Resources 目录下建 shared 文件夹,用于存放本地配置文件。
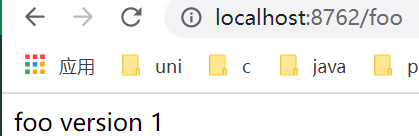
在该文件夹下新建config-client-dev.yml文件,用作 dev (开发环境〉的配置文件:#client dev (开发环境〉的配置文件 server: port: 8762 foo: foo version 1 - 在主工程里面创建config-client module工程。
配置pom.xml:<?xml version="1.0" encoding="UTF-8"?> <project xmlns="http://maven.apache.org/POM/4.0.0" xmlns:xsi="http://www.w3.org/2001/XMLSchema-instance" xsi:schemaLocation="http://maven.apache.org/POM/4.0.0 https://maven.apache.org/xsd/maven-4.0.0.xsd"> <modelVersion>4.0.0</modelVersion> <parent> <groupId>org.zwq</groupId> <artifactId>cloud-config</artifactId> <version>1.0-SNAPSHOT</version> <relativePath/> <!-- lookup parent from repository --> </parent> <groupId>com.zwq</groupId> <artifactId>config-client</artifactId> <version>0.0.1-SNAPSHOT</version> <name>config-client</name> <description>Demo project for Spring Boot</description> <properties> <java.version>1.8</java.version> </properties> <dependencies> <dependency> <groupId>org.springframework.boot</groupId> <artifactId>spring-boot-starter-web</artifactId> </dependency> <dependency> <groupId>org.springframework.cloud</groupId> <artifactId>spring-cloud-starter-config</artifactId> </dependency> </dependencies> <build> <plugins> <plugin> <groupId>org.springframework.boot</groupId> <artifactId>spring-boot-maven-plugin</artifactId> </plugin> </plugins> </build> </project>
修改配置文件,bootstrap.yml:#向 Uri 地址为 http://localhost:8769的 Config Server 读取配置文件 spring: application: name: config-client cloud: config: uri: http://localhost:8769 fail-fast: true profiles: active: dev - 启动config-server,然后启动config-client服务,可以看见client读取了server的配置文件。并且开的端口是8762
- 进一步验证:在config-client新建包controller,新建TestController,写一个接口读取配置文件的foo变量:
import org.springframework.beans.factory.annotation.Value; import org.springframework.web.bind.annotation.RequestMapping; import org.springframework.web.bind.annotation.RestController; /** * description: 测试 * * @author zwq * @date 2021/10/23 22:42 */ @RestController public class TestController { @Value("${foo}") String foo; @RequestMapping(value = "/foo") public String foo() { return foo; } } - 访问 http://localhost:8762/foo :
从远程Git读取配置文件
Spring Cloud Config 可以从远程 Git 仓库读取配置文件,这样就能将配置统一管理。并且也能通过Spring Cloud Bus 在不人工启动程序的情况下对 Config Client 的配置进行刷新。
配置
首先修改Config Server配置文件application.yml:
server:
  port: 8769

# remote git
spring:
  cloud:
    config:
      server:
        git:
          uri: https://github.com/zwqmore/SpringcloudConfig.git
          searchPaths: respo
          force-pull: true
          timeout: 20
          strict-host-key-checking: false
          #username:
          #password:
          default-label: main
      label: main
  application:
    name: config-server
如果是私人Git仓库,需要登录用户名和密码。
然后将eureka client-dev.yml上传到github仓库。同时修改一下配置文件的变量:
foo: foo version 2访问测试
启动config-server,config-client服务,访问http://localhost:8762/foo :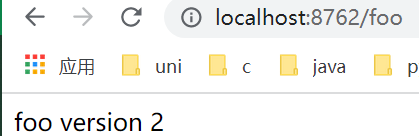
config-server从远程Git仓库读取配置文件成功。
构建高可用的Config Server
当服务实例很多时,所有的服务实例需要同时从配置中心Config Server 读取配置文件,这时可以考虑将配置中心 Config Server 做成一个微服务,并且将其集群化,从而达到高可用。
Config Server架构图: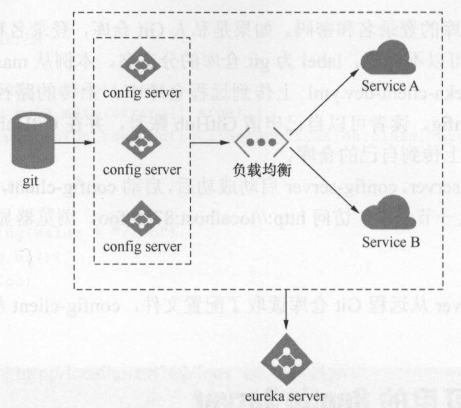
配置
新建module工程eureka-server,配置pom.xml:
<?xml version="1.0" encoding="UTF-8"?>
<project xmlns="http://maven.apache.org/POM/4.0.0" xmlns:xsi="http://www.w3.org/2001/XMLSchema-instance"
         xsi:schemaLocation="http://maven.apache.org/POM/4.0.0 https://maven.apache.org/xsd/maven-4.0.0.xsd">
    <modelVersion>4.0.0</modelVersion>
    <parent>
        <groupId>org.zwq</groupId>
        <artifactId>cloud-config</artifactId>
        <version>1.0-SNAPSHOT</version>
        <relativePath/> <!-- lookup parent from repository -->
    </parent>
    <groupId>com.zwq</groupId>
    <artifactId>eureka-server</artifactId>
    <version>0.0.1-SNAPSHOT</version>
    <name>eureka-server</name>
    <description>Demo project for Spring Boot</description>
    <properties>
        <java.version>1.8</java.version>
    </properties>
    <dependencies>
        <dependency>
            <groupId>org.springframework.boot</groupId>
            <artifactId>spring-boot-starter-web</artifactId>
        </dependency>

        <dependency>
            <groupId>org.springframework.cloud</groupId>
            <artifactId>spring-cloud-starter-eureka-server</artifactId>
        </dependency>
    </dependencies>

    <build>
        <plugins>
            <plugin>
                <groupId>org.springframework.boot</groupId>
                <artifactId>spring-boot-maven-plugin</artifactId>
            </plugin>
        </plugins>
    </build>

</project>
配置application.yml:
server:
  port: 8761
eureka:
  client:
    register-with-eureka: false
    fetch-registry: false
    serviceUrl:
      defaultZone: http://localhost:${server.port}/eureka/
在启动类加上@EnableEurekaServer注解,开启EnableServer功能
修改Config-Server工程:
pom.xml加上依赖:
<dependency>
          <groupId>org.springframework.cloud</groupId>
          <artifactId>spring-cloud-starter-eureka</artifactId>
      </dependency>
作为eureka-client,同时在启动类加上@EnableEurekaClient注解。
配置application.yml:
server:
  port: 8769

# remote git
spring:
  cloud:
    config:
      server:
        git:
          uri: https://github.com/zwqmore/SpringcloudConfig.git
          searchPaths: respo
          force-pull: true
          timeout: 20
          strict-host-key-checking: false
          #username:
          #password:
          default-label: main
      label: main
  application:
    name: config-server

eureka:
  client:
    serviceUrl:
      defaultZone: http://localhost:8761/eureka/
修改Config-Client
pom.xml加上依赖:
<dependency>
            <groupId>org.springframework.cloud</groupId>
            <artifactId>spring-cloud-starter-eureka</artifactId>
        </dependency>
作为eureka-client,同时在启动类加上@EnableEurekaClient注解。
配置application.yml:
spring:
  application:
    name: config-client
  cloud:
    config:
      #uri: http://localhost:8769
      fail-fast: true
      discovery:
        enabled: true
        service-id: config-server
  profiles:
    active: dev

server:
  port: 8762

eureka:
  client:
    serviceUrl:
      defaultZone: http://localhost:8761/eureka/
访问测试
启动eureka-server,两个config-server实例(不同端口启动)
然后多次启动config-client服务,控制台可以发现config-client从不同端口读取配置文件,并且做了负载均衡。